Profit Tracking 💰
Profit Tracking helps you see how much money your projects actually make — automatically, using your team's timesheets.
Instead of guessing whether a project is profitable, you can see revenue, costs, and profit in real time, for every project, client, and across your entire workspace.
In this article
- Who can access Profit Tracking
- Before you start: set up team rates
- Set up profit tracking for a project
- Billing types
- Understanding the Profit page
- Revenue section
- Labor Cost section
- Expenses
- Project-specific billable rates
- Client-level profit
- Profitability report
- How rates work (forward-only)
- Non-billable projects
- Don't need this?
- FAQs
Who can access Profit Tracking
Profit Tracking is available to workspace owners and admins only.
Team members cannot see the Profit tab. Financial data stays private.
Guests (clients) also cannot see profit data.
Before you start: set up team rates
Before setting up profit tracking on a project, you need to configure billable rates and cost rates for your team members.
These rates are set at the workspace level and apply across all projects.
Important: Time entries logged before a member's rates are set will not be included in profit or cost calculations — even after you set the rates later. Rates only apply to time entries created after the rates are configured. Set up your team's rates before they start logging time on projects you want to track.
How to set rates
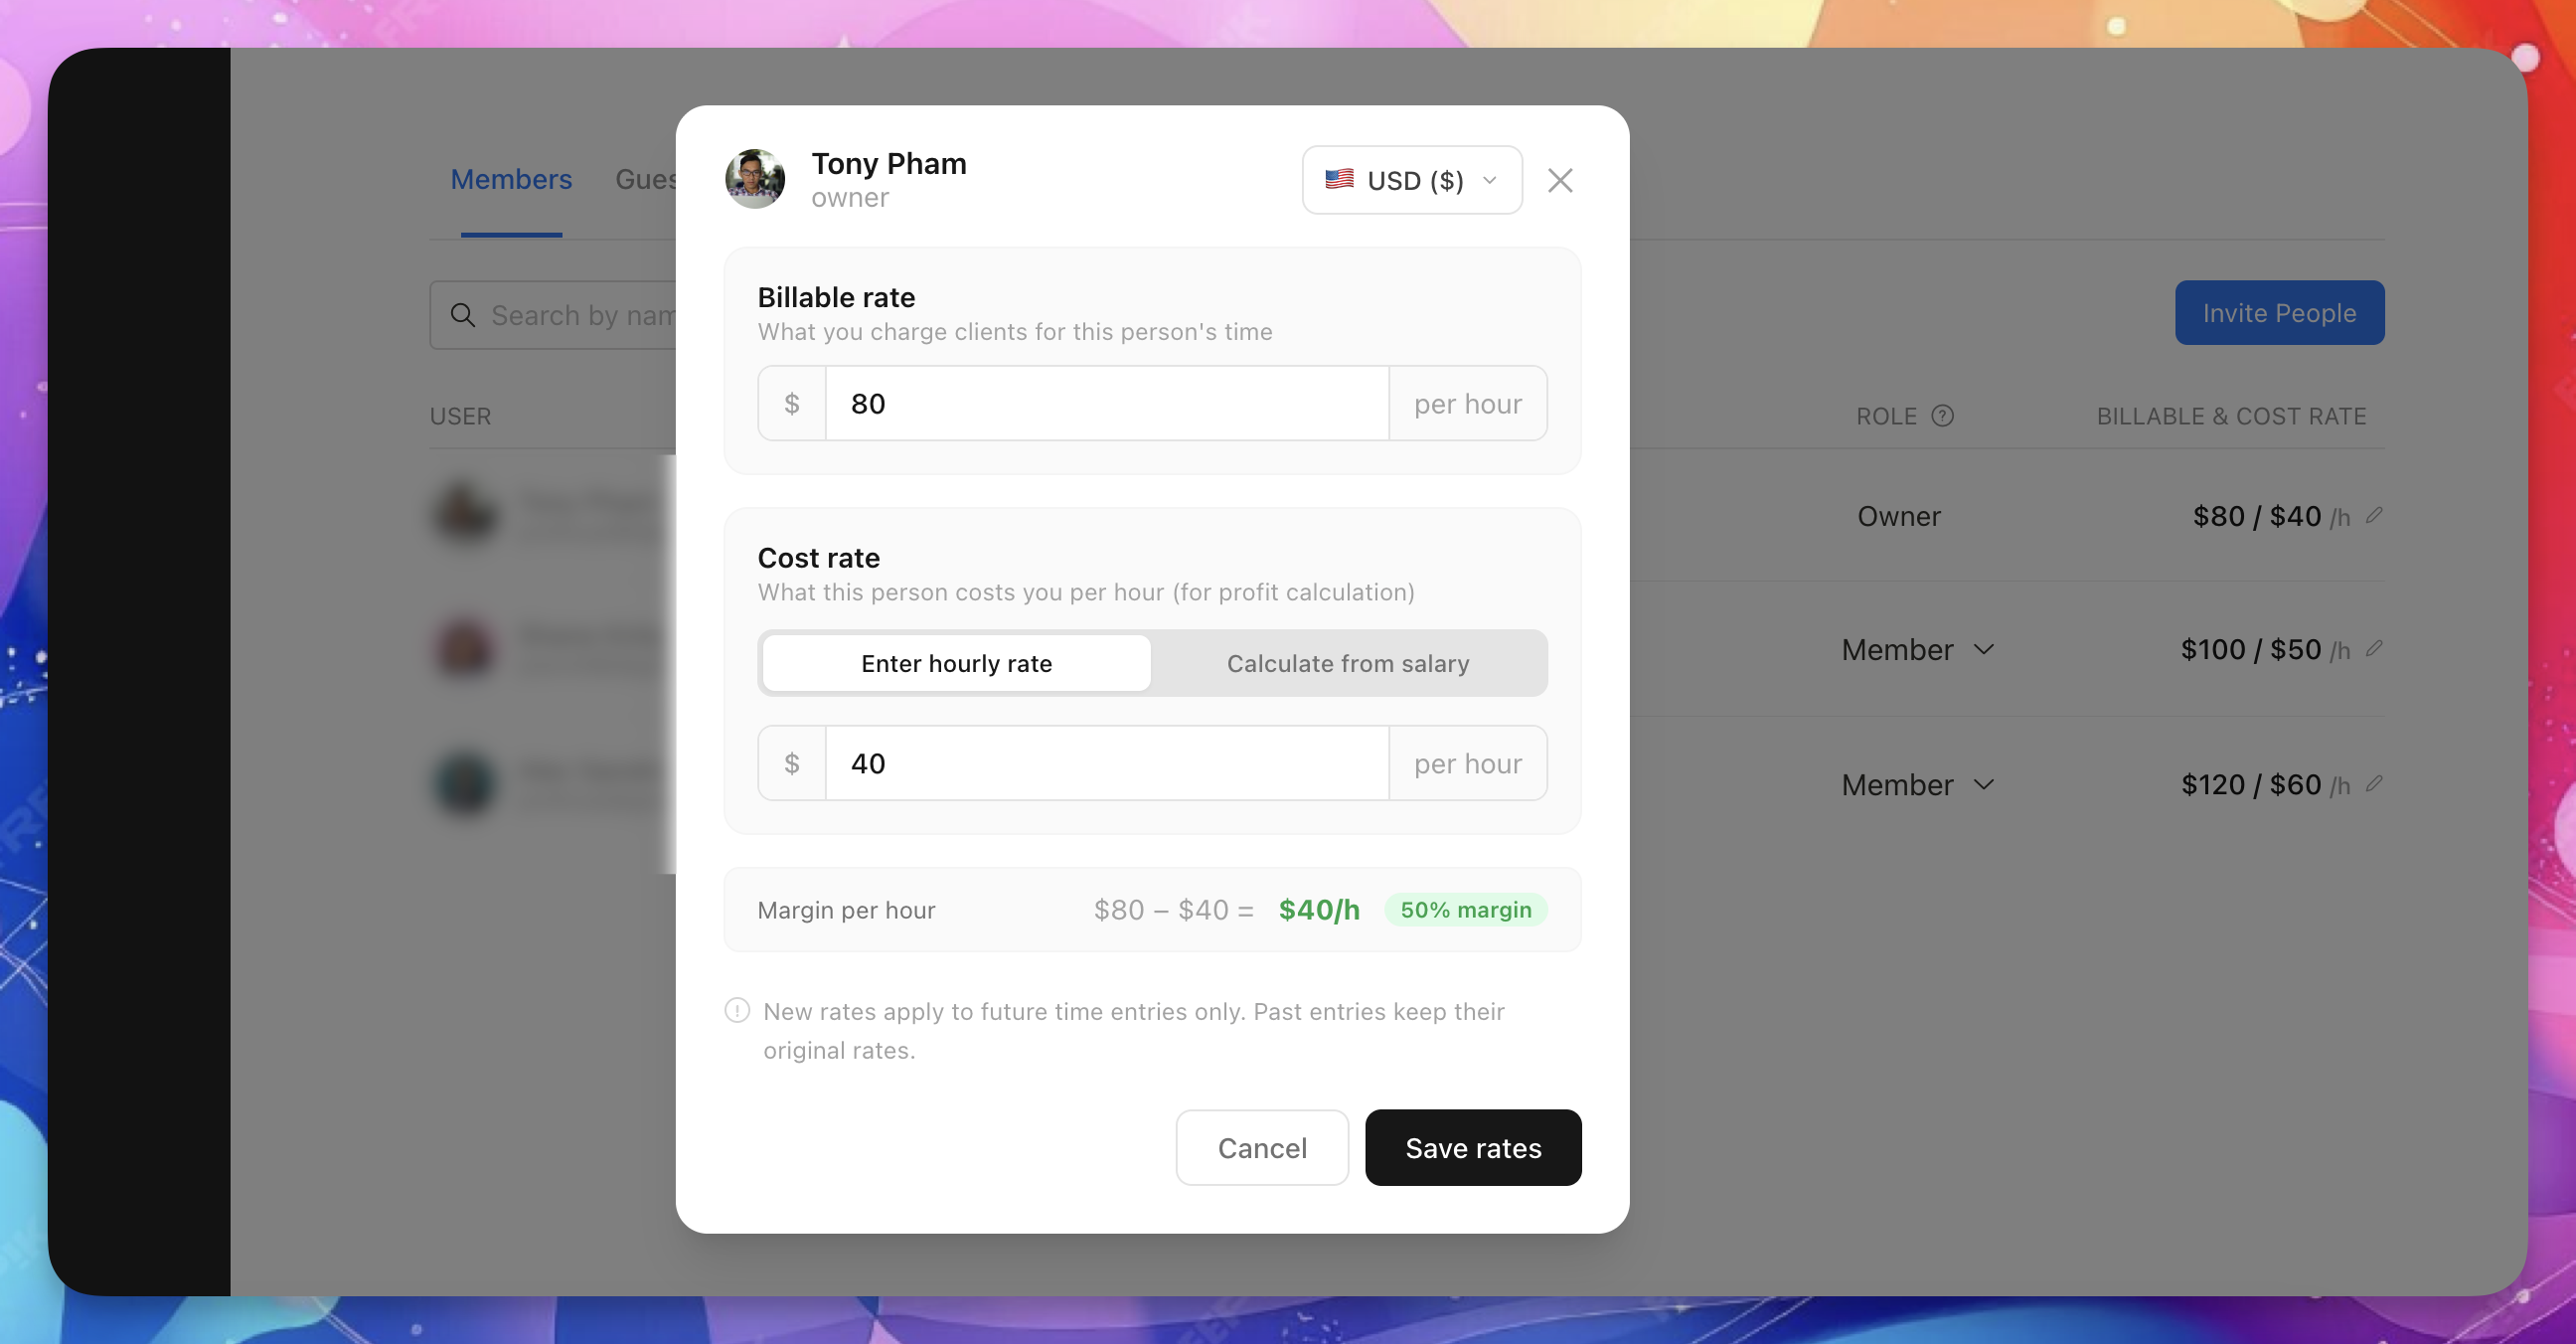
- Go to Settings → People - Members.
- Click a team member's rate column to open the rate modal.
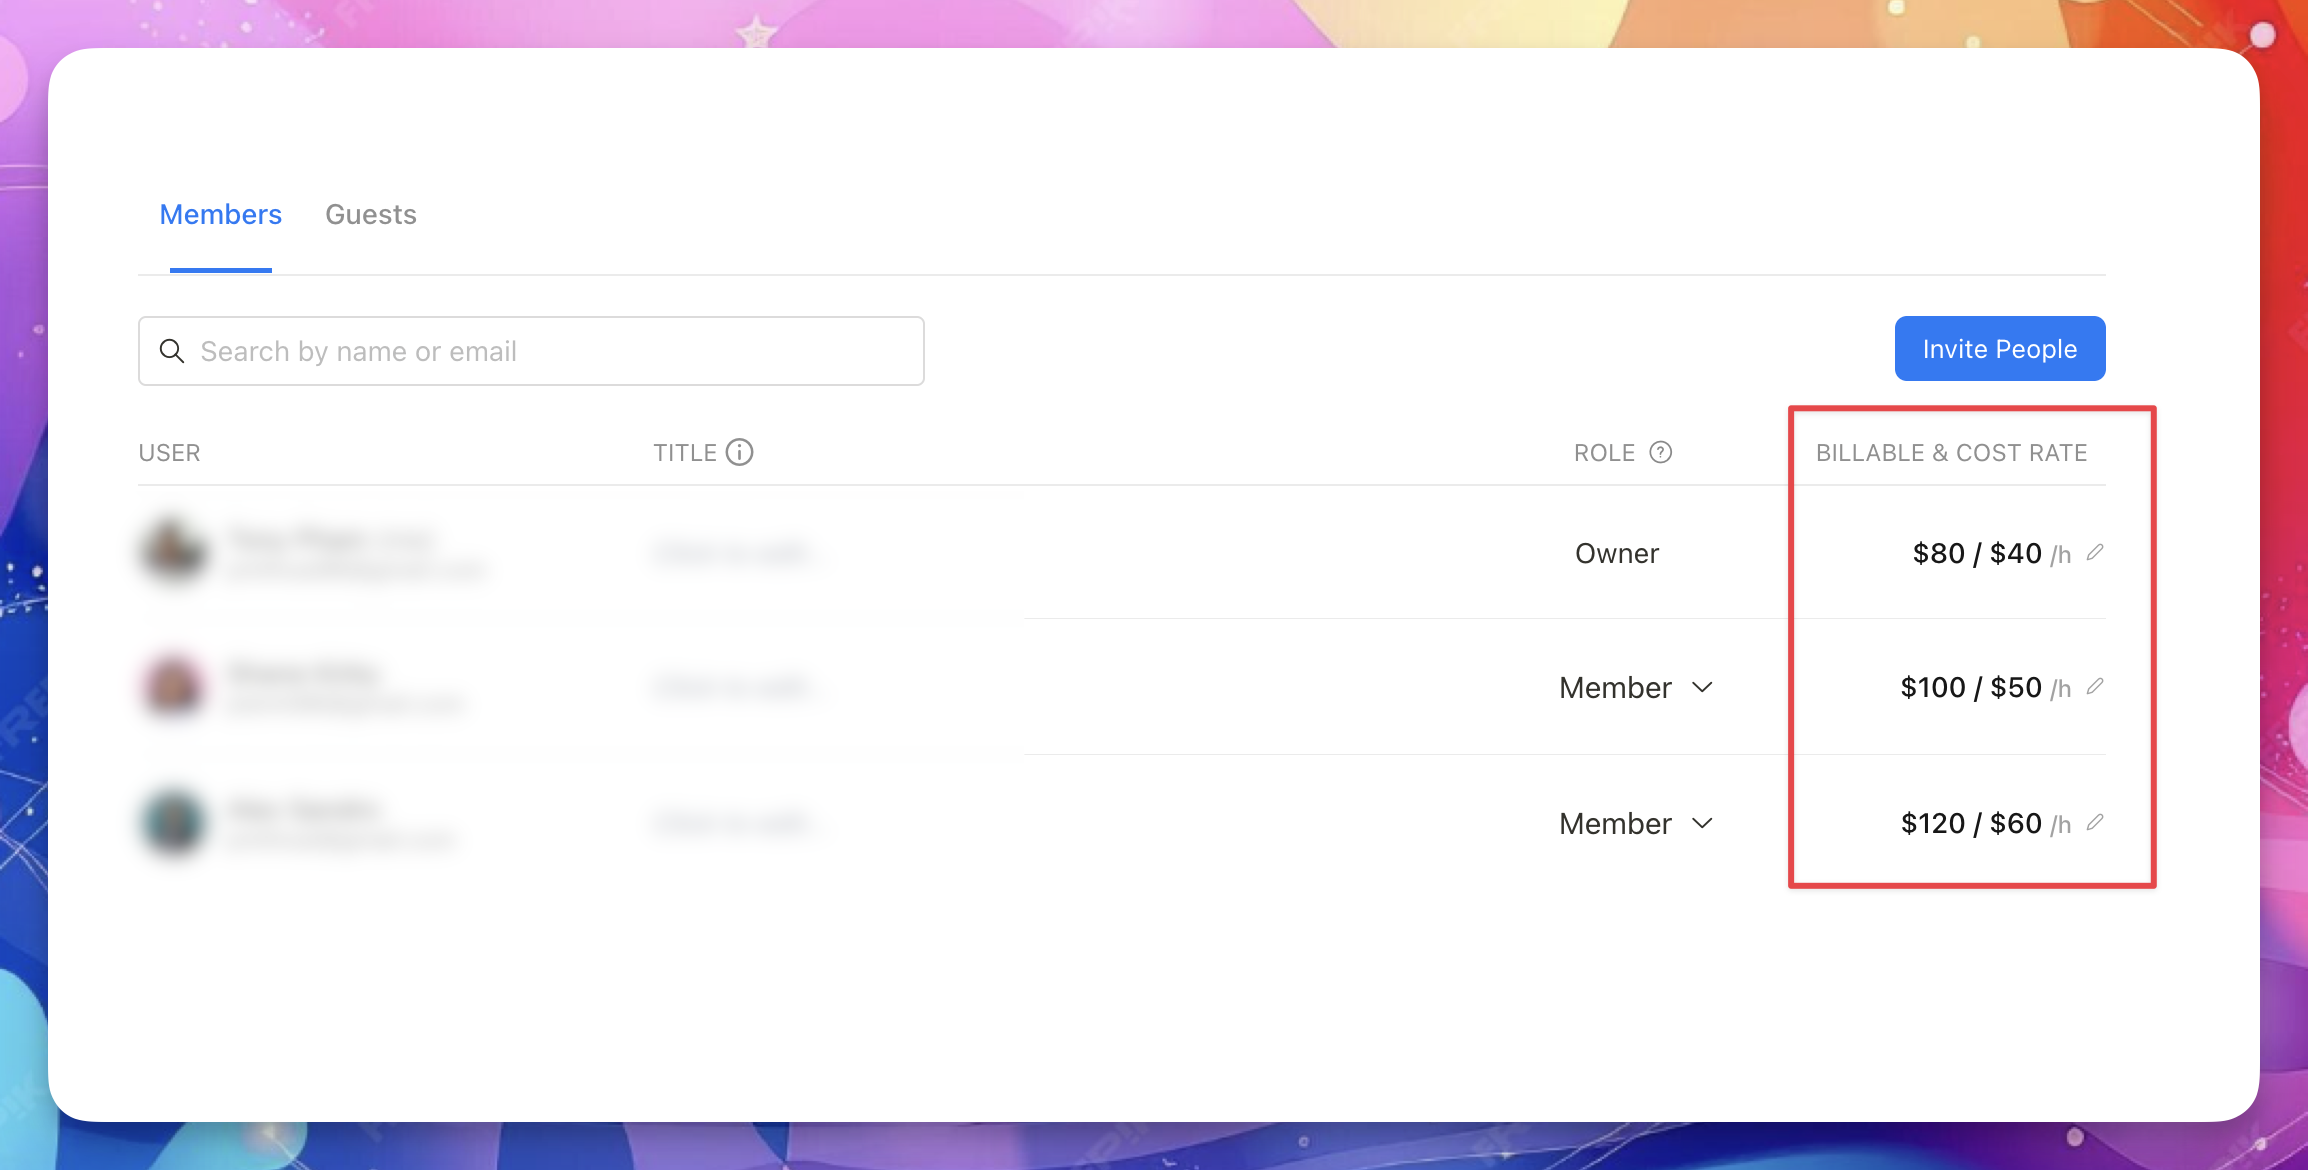
- Set the billable rate — what you charge clients for this person's time.
- Set the cost rate — what this person costs you per hour.
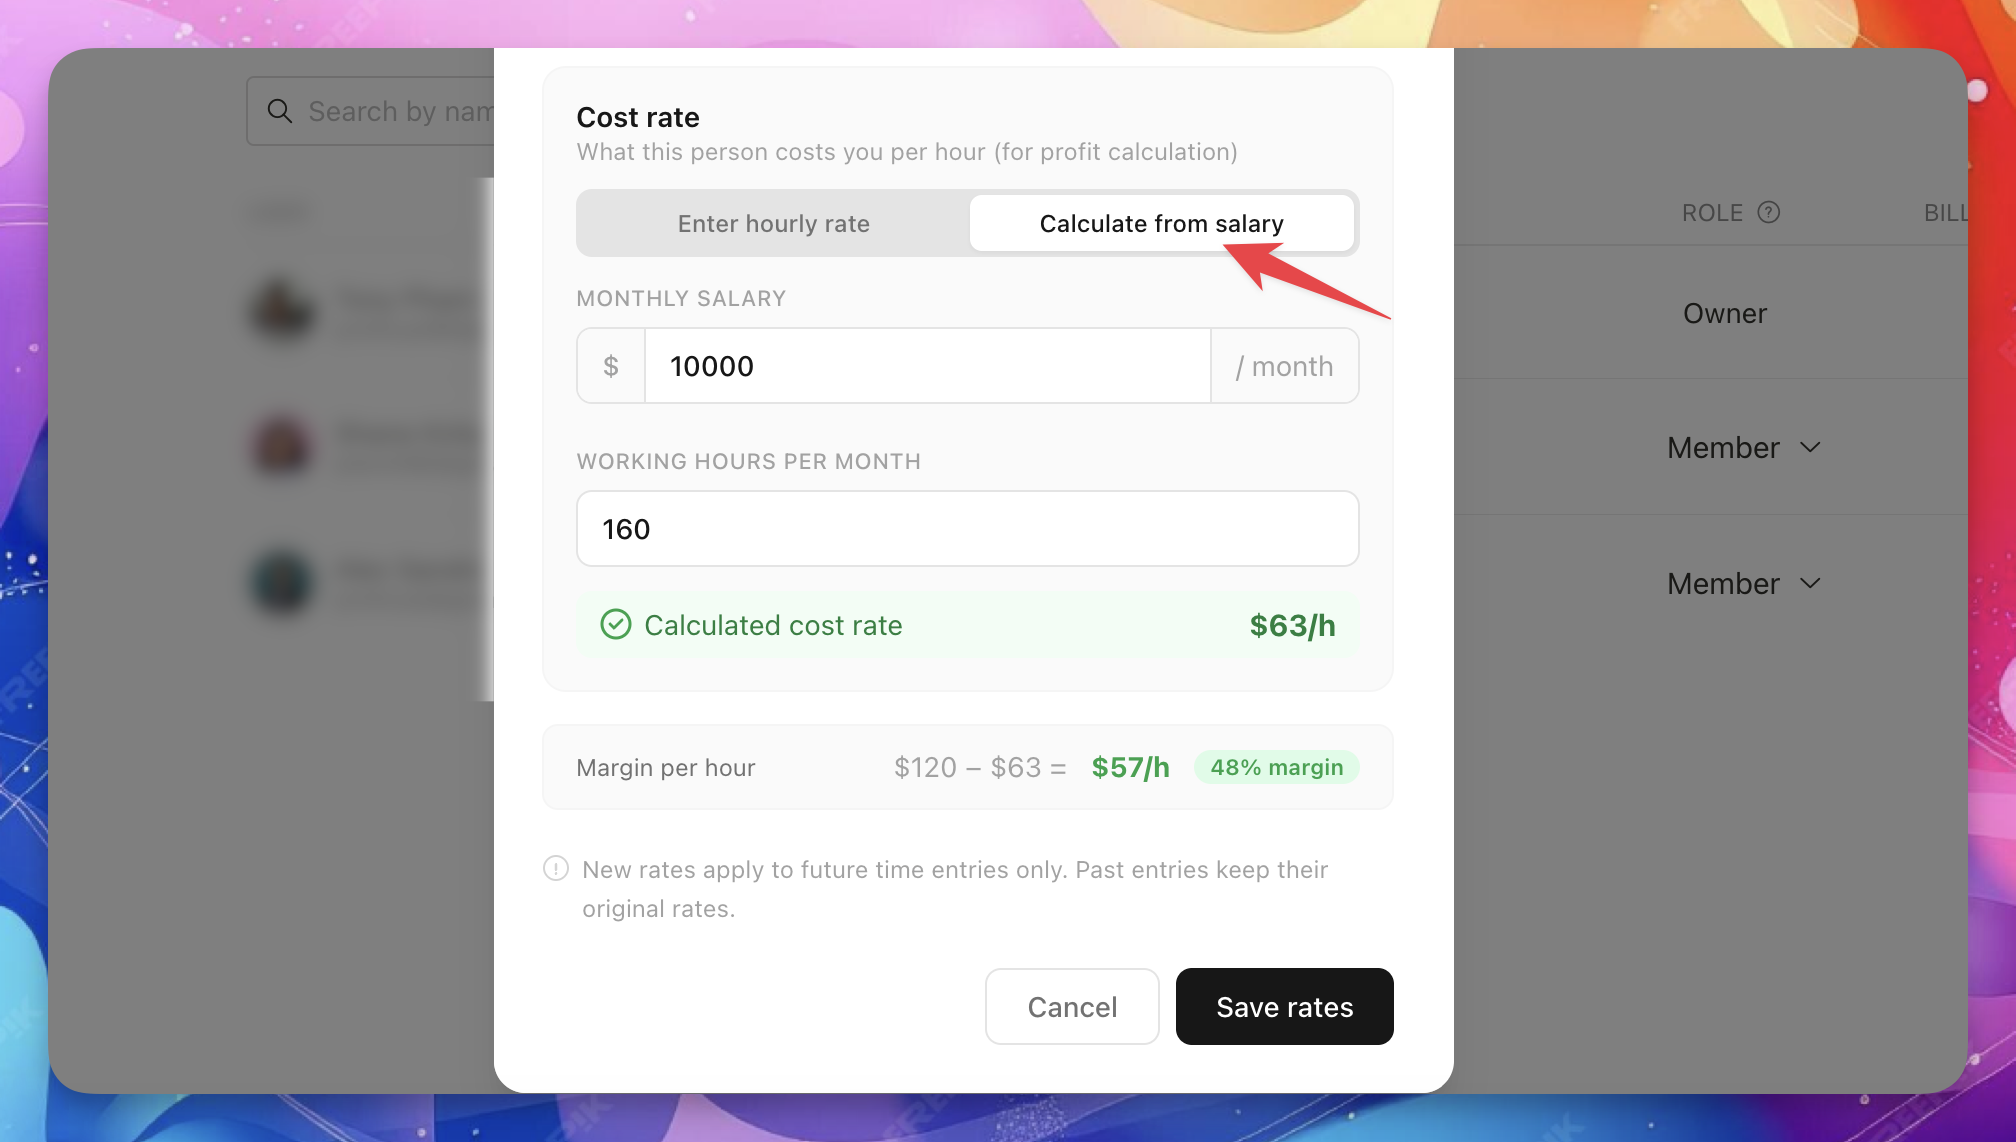
You can enter the cost rate directly, or calculate it from a monthly salary.
Calculate cost rate from salary
- In the rate modal, switch to Calculate from salary.
- Enter the monthly salary.
- Enter working hours per month (default: 160).
- Upbase calculates the hourly cost rate automatically.
Margin preview
When both rates are set, the modal shows a live margin per hour preview.
For example: $110/h billable − $55/h cost = $55/h margin (50%).
Workspace currency
Click the currency button inside the rate modal to change your workspace currency.
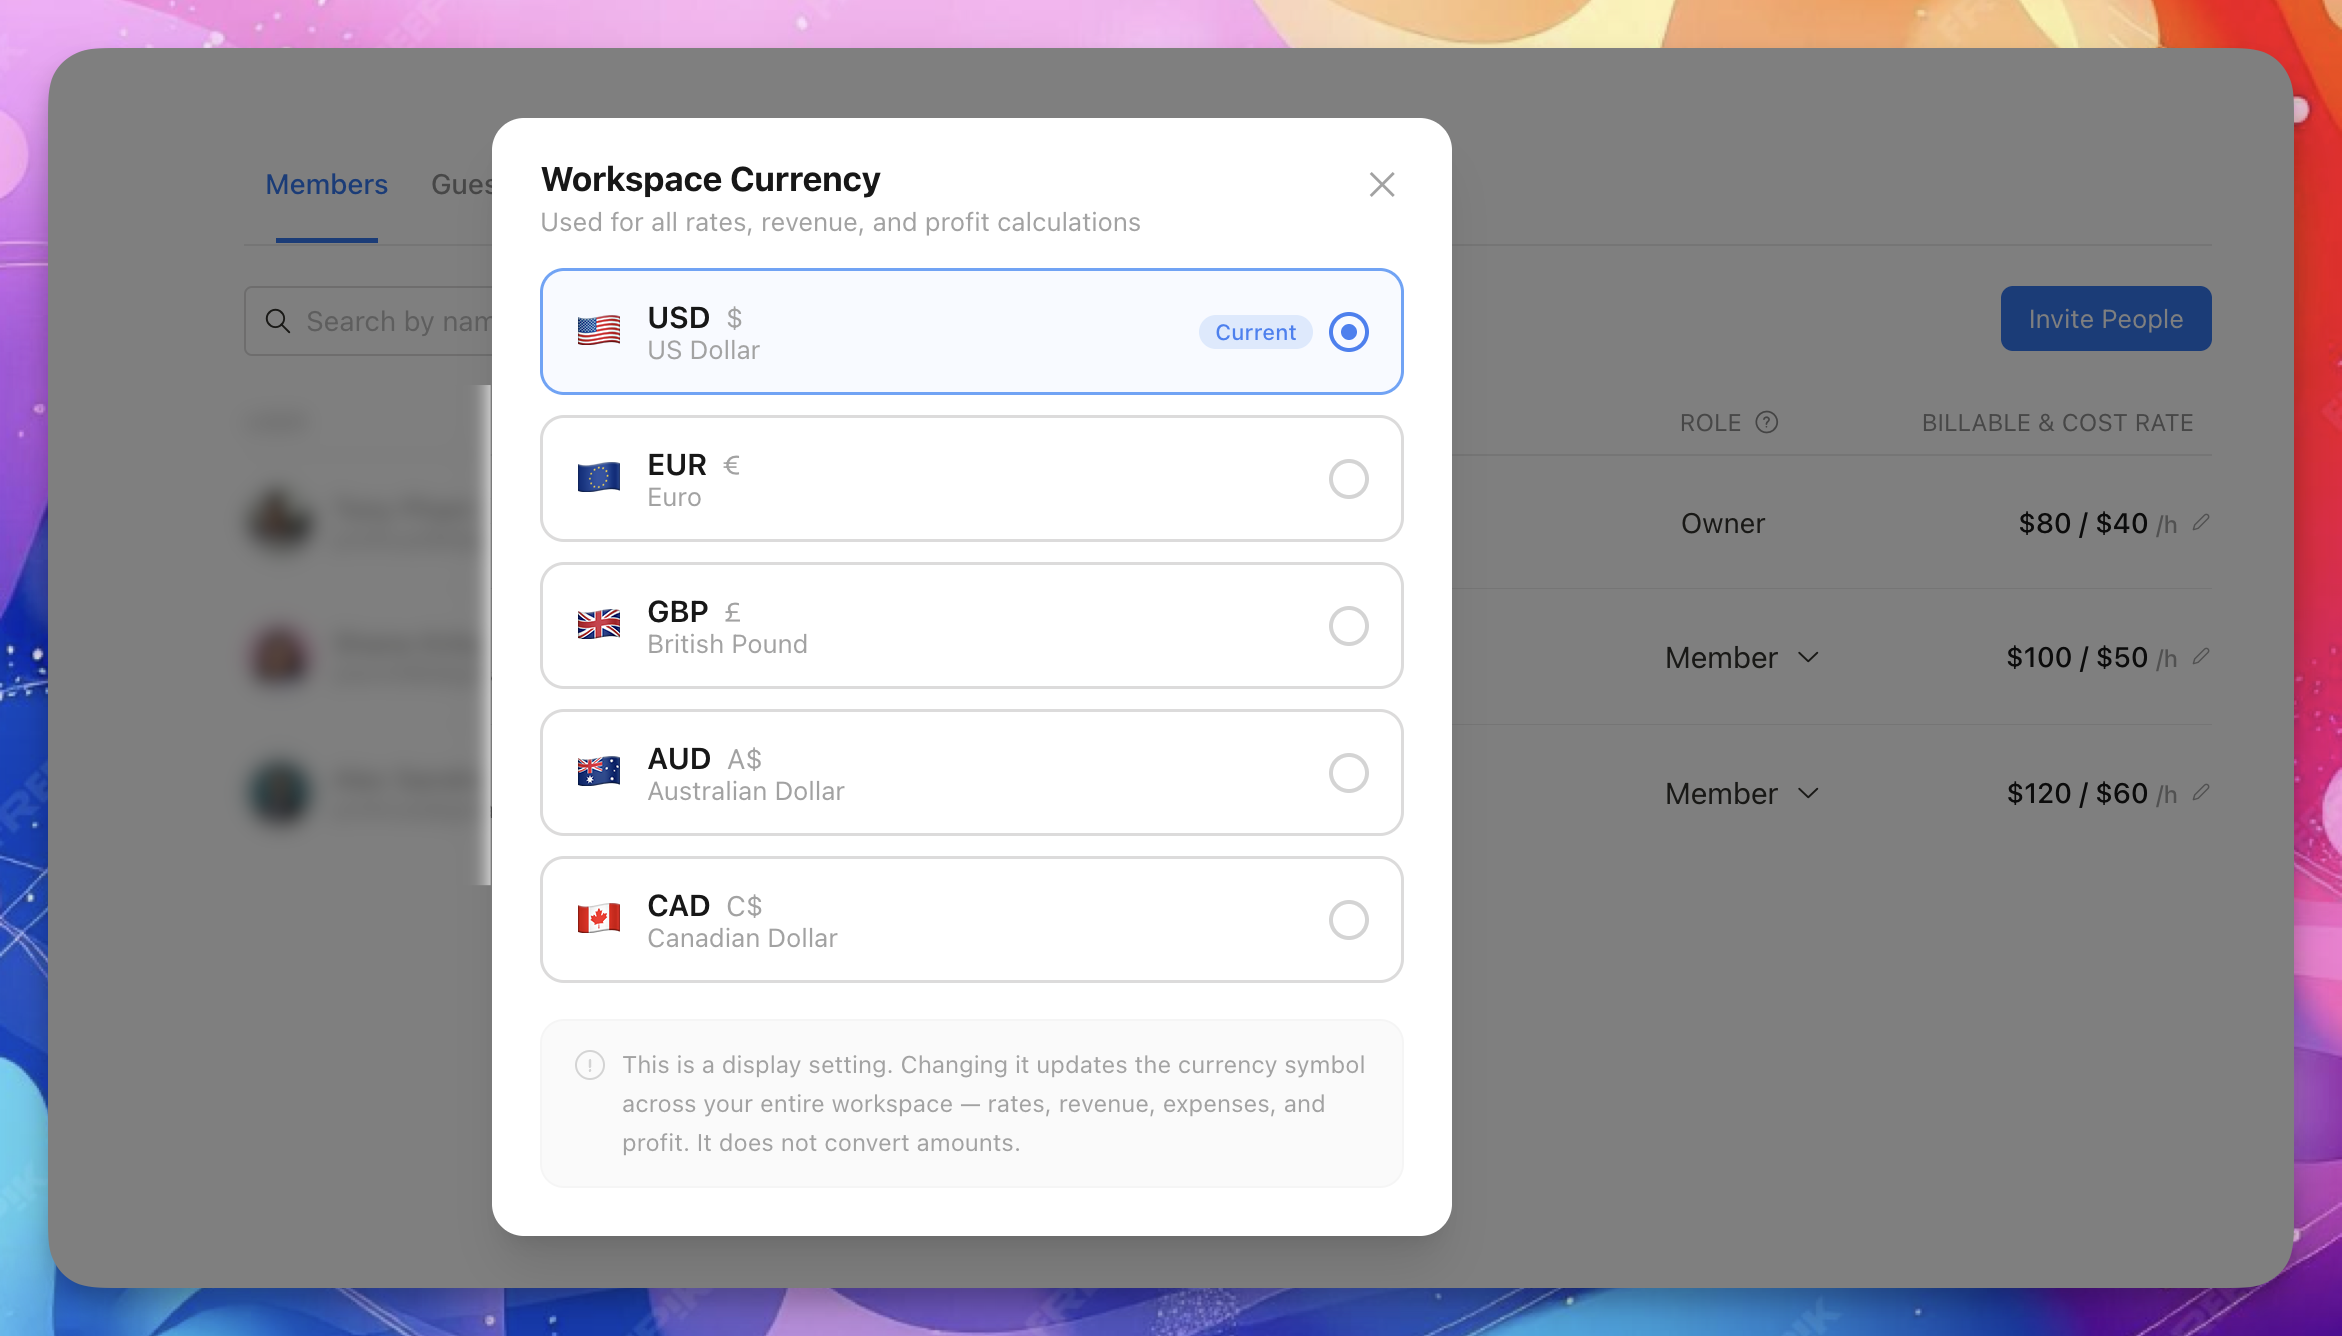
This changes the currency symbol across your entire workspace. It does not convert amounts. If you switch from USD to EUR, the numbers stay the same.
Set up profit tracking for a project
- Open any project.
- Click the Profit tab.
- Click Set up profit tracking.
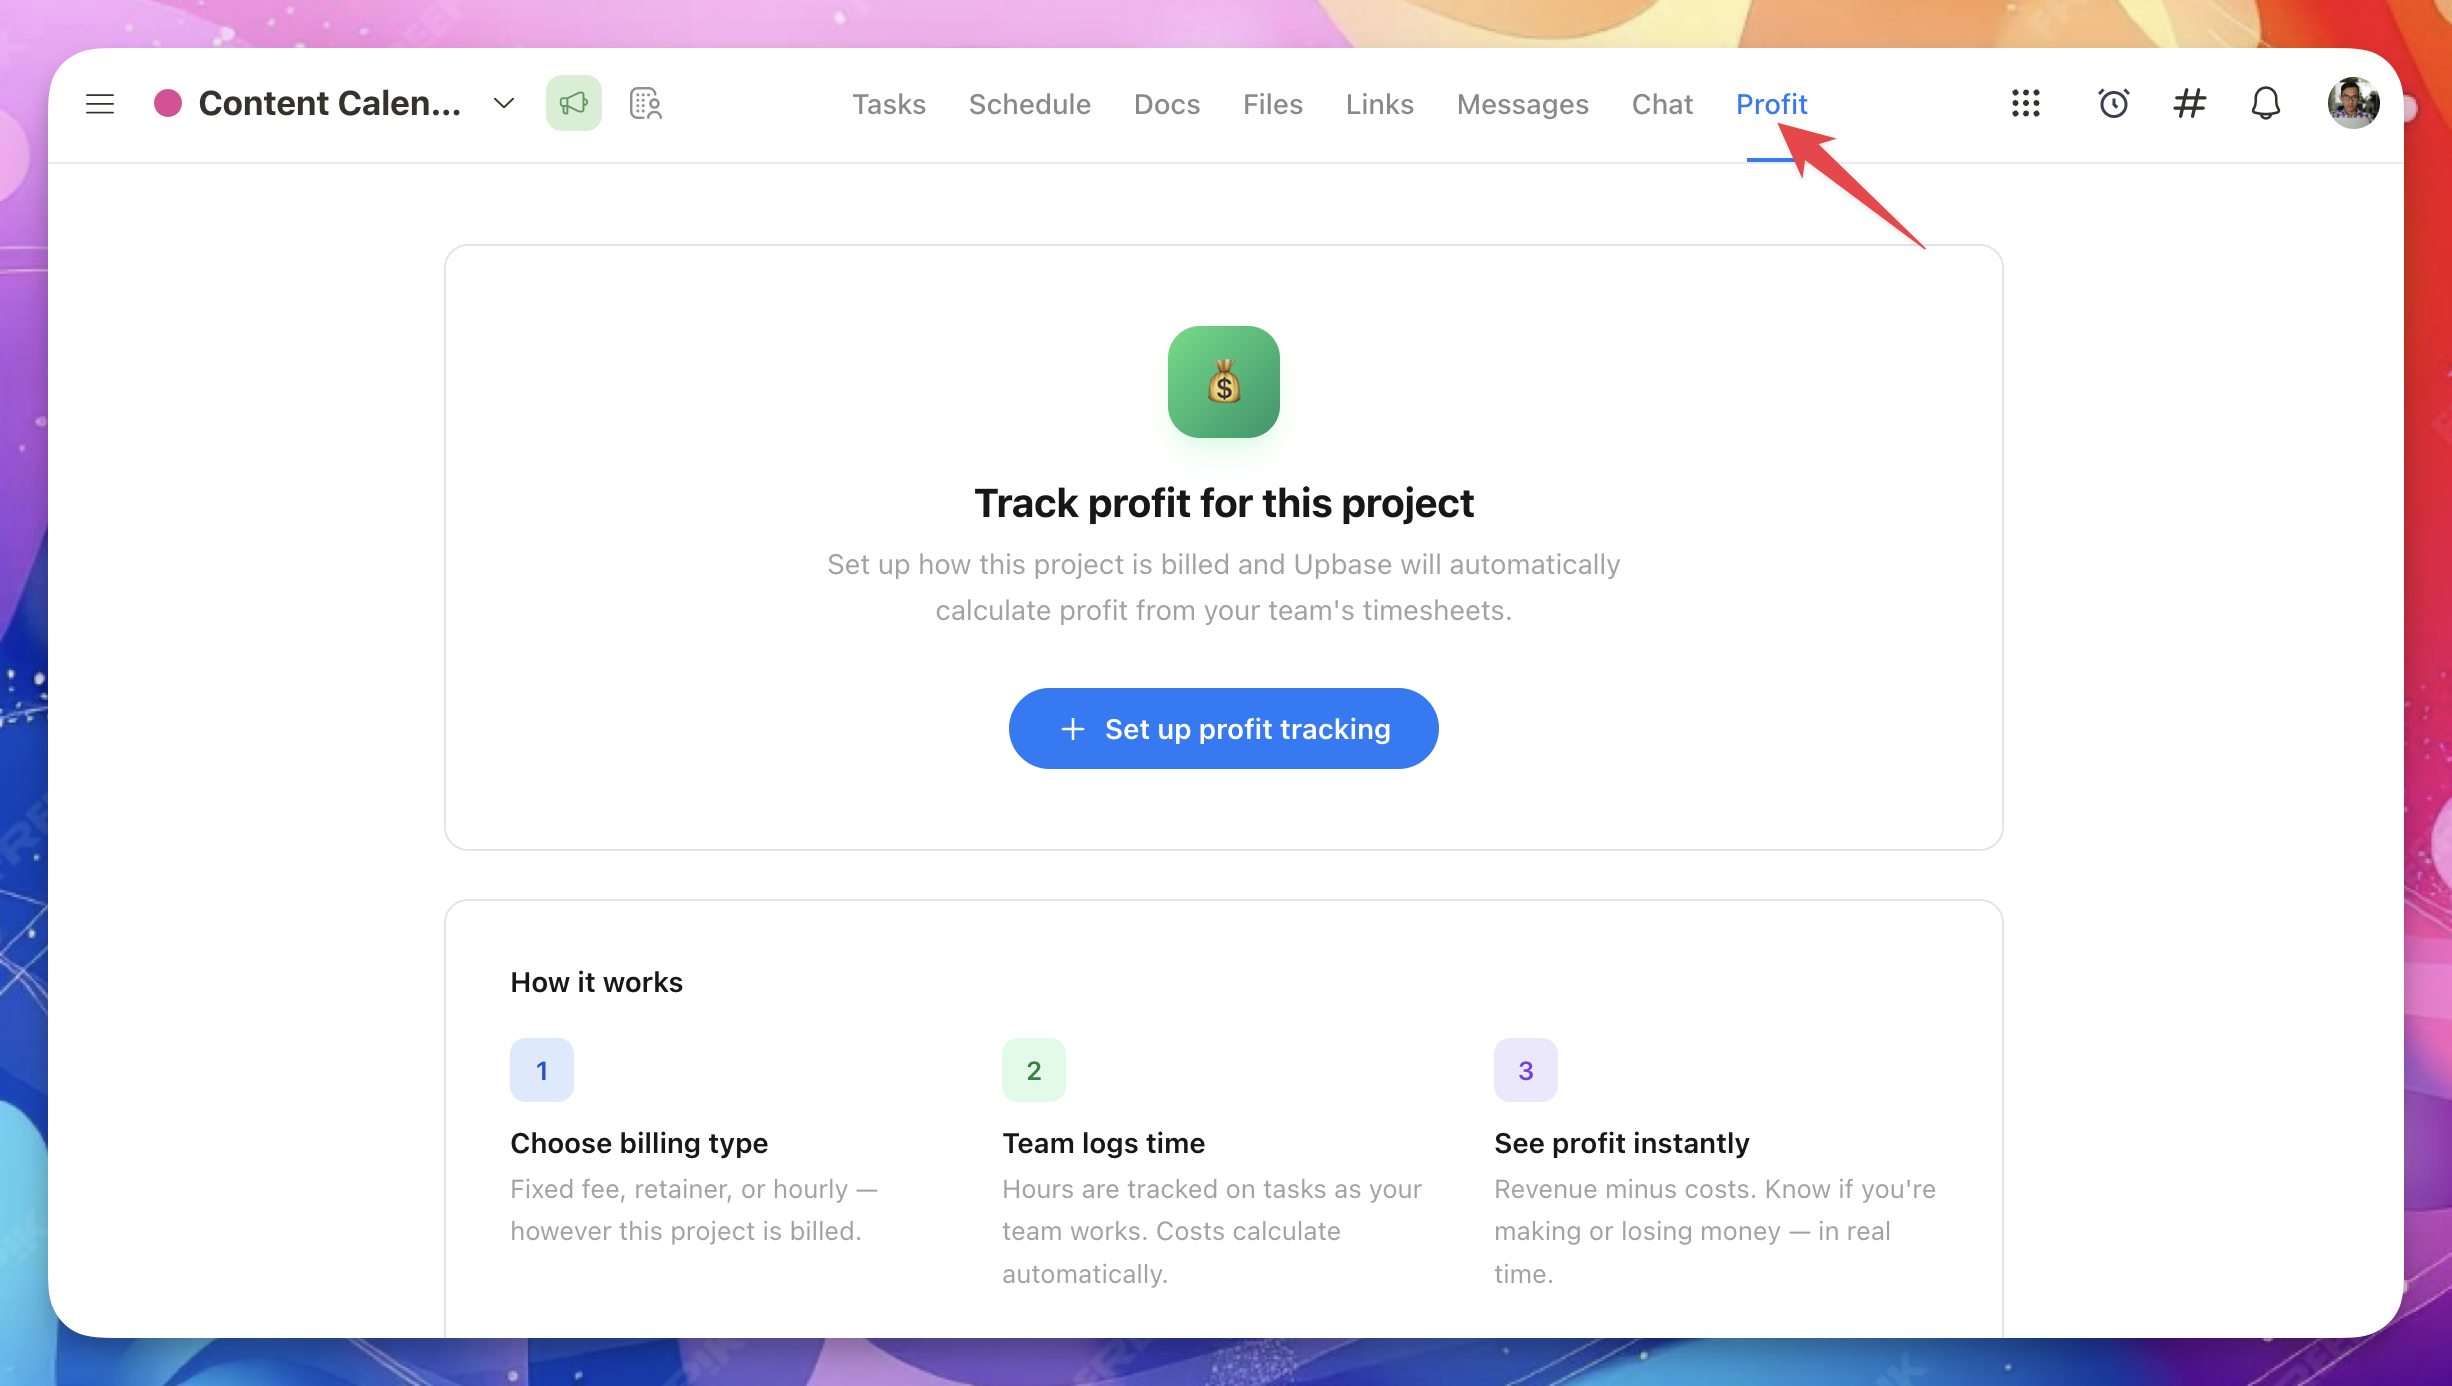
- Choose a billing type (Fixed Fee, Retainer, Hourly, or Non-billable).
- Fill in the required fields.
- Click Save.
The Profit page is now active for this project.
Tip: If you haven't set up team rates yet, you'll see a blue callout reminding you to do that first. Click Go to Settings → Members to set rates before configuring the project.
Billing types
When setting up profit tracking, you choose how the project is billed.
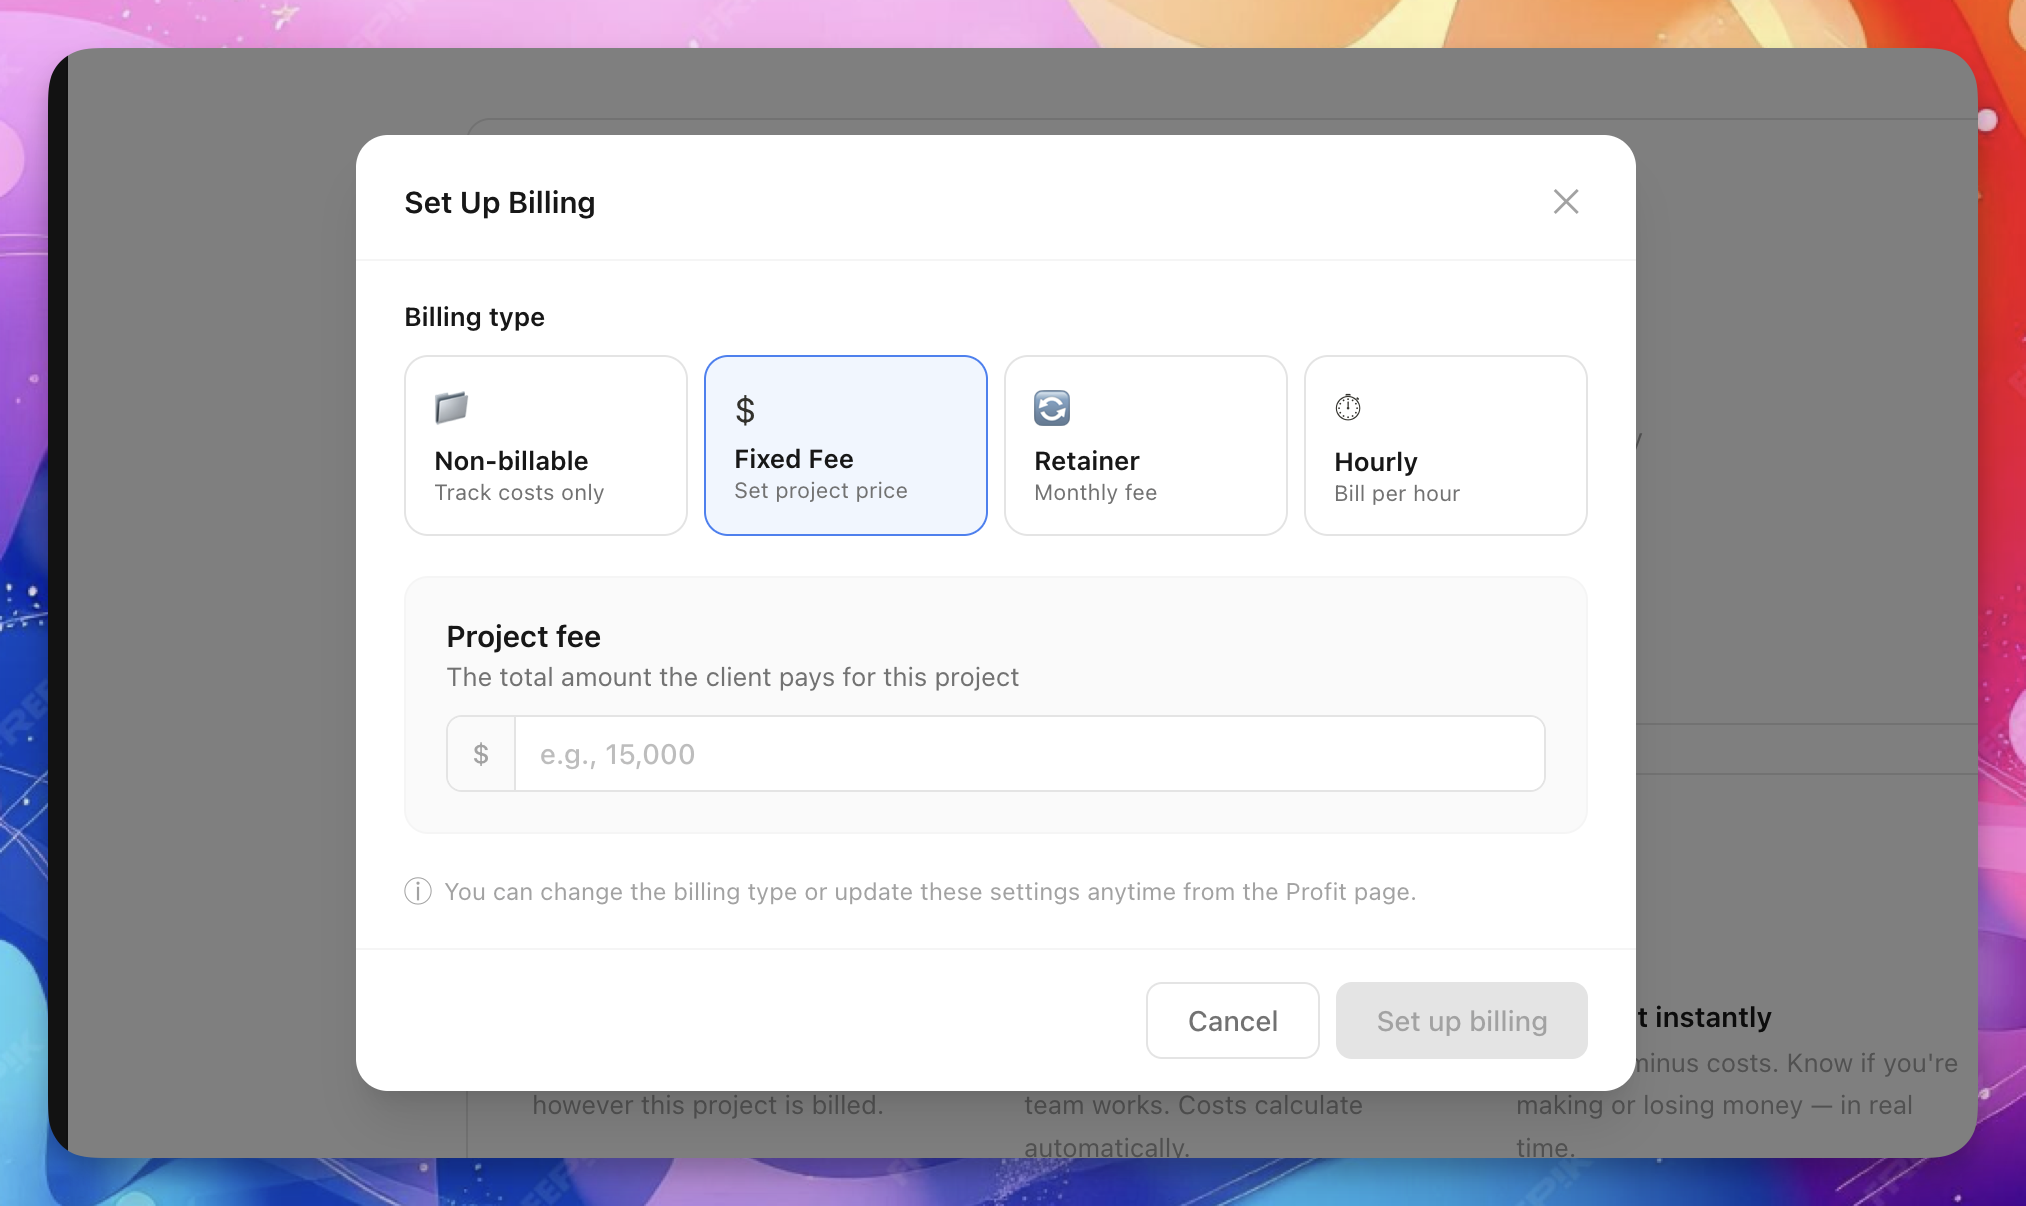
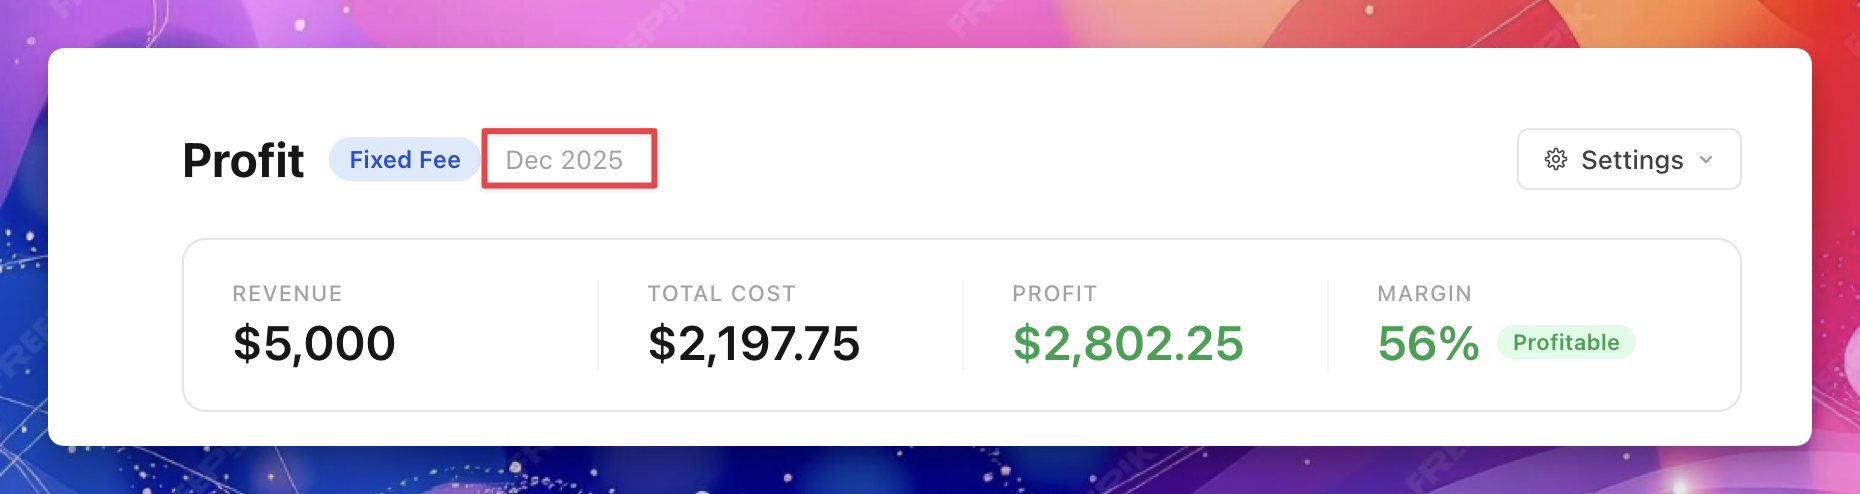
Fixed Fee
A one-time project fee. Revenue is the total fee you agreed on.
You'll enter: Project fee amount.
Retainer
A recurring monthly fee with a set number of hours. Revenue is the fee per billing cycle.
You'll enter:
- Monthly fee
- Included hours (optional)
- Cycle start date (the day of the month billing cycles begin)
- Contract end dates
- Rollover settings (optional) — what happens with unused or overspent hours
Hourly
Revenue is calculated from billable hours × billable rates. No fixed fee.
You'll enter: Nothing extra — revenue calculates automatically from timesheets.
Non-billable
For internal projects that have no revenue. Tracks costs only.
Understanding the Profit page
After setup, the Profit page shows your project's financial summary.
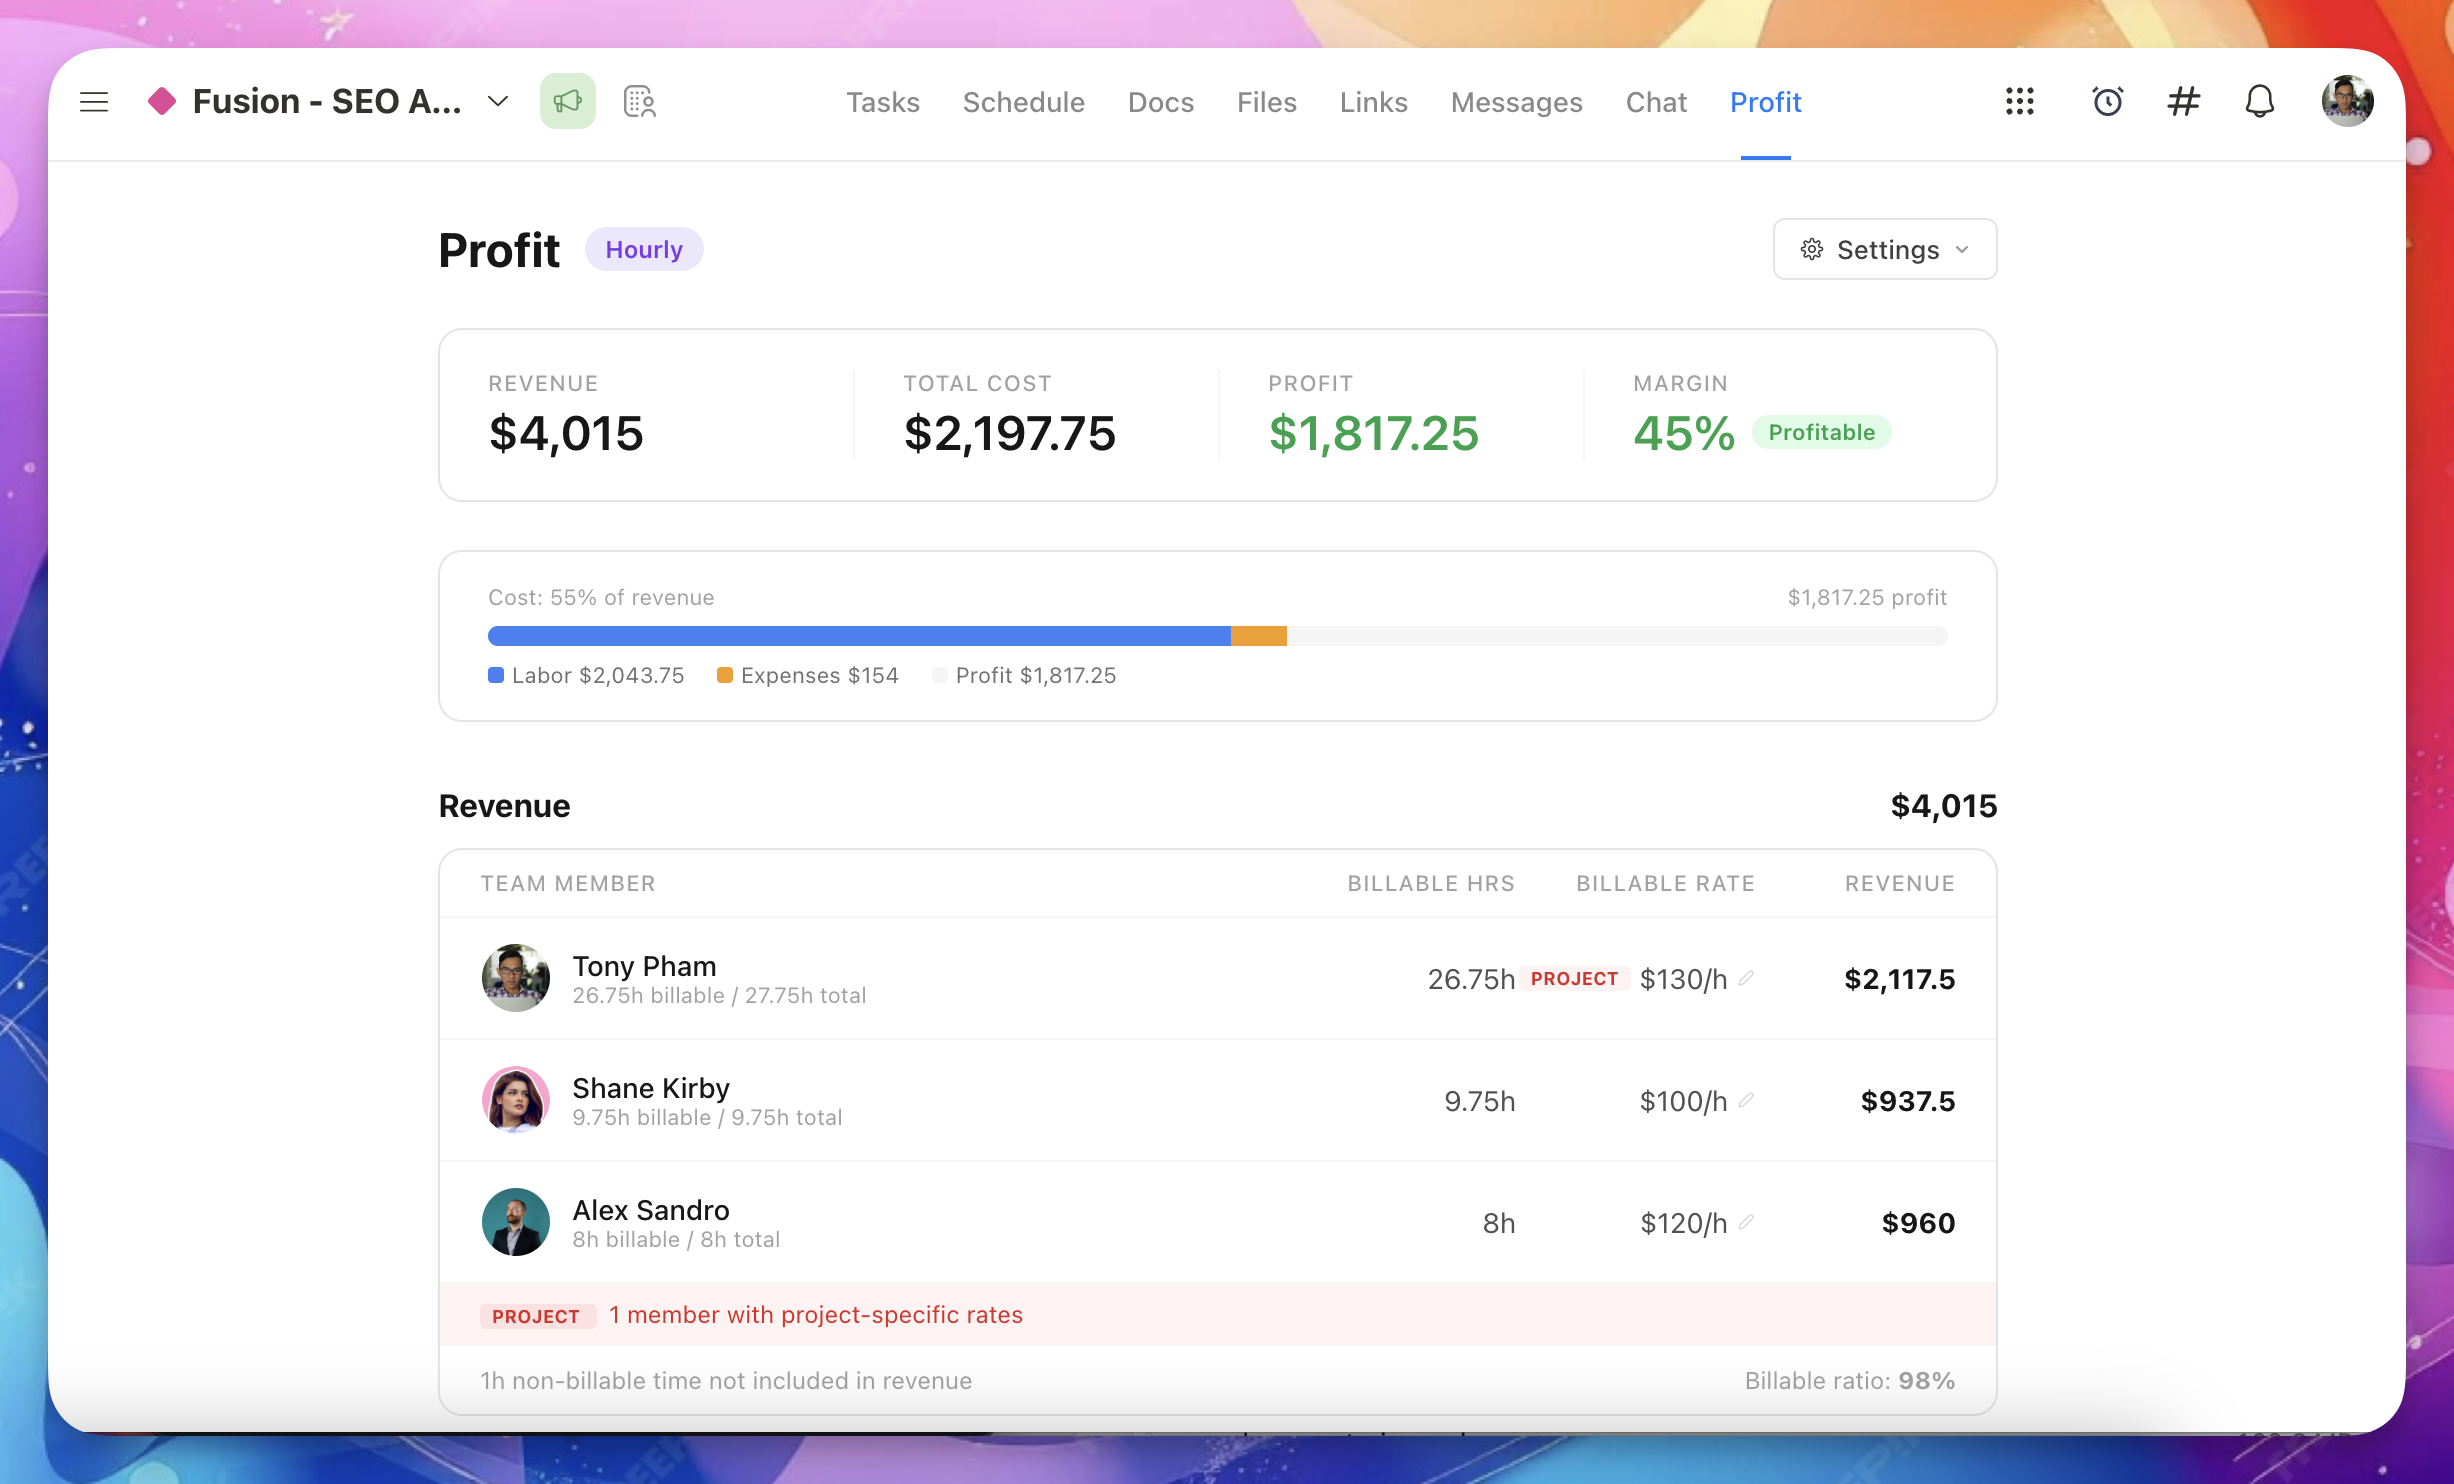
Profit summary
The top section shows four key numbers:
- Revenue — what you earn from the project
- Total Cost — labor cost + expenses
- Profit — revenue minus total cost
- Margin — profit as a percentage of revenue
Green means profitable. Red means loss.
Cost bar
Below the summary, a visual bar shows how much of your revenue goes to costs.
- Blue = labor cost
- Amber = expenses
- Gray = profit
Revenue section
This section shows where your revenue comes from.
What you see depends on the billing type:
- Fixed Fee: The total project fee
- Retainer: The monthly fee, included hours, and contract progress
- Hourly: A breakdown of each team member's billable hours × billable rate
Retainer contract progress
For retainer projects, the Revenue section also shows:
- Which billing cycle you're in (e.g., "Month 3 of 12")
- Total contract value
- A cumulative summary showing total revenue, cost, profit, and margin across all elapsed cycles
Use the period navigator to switch between billing cycles.
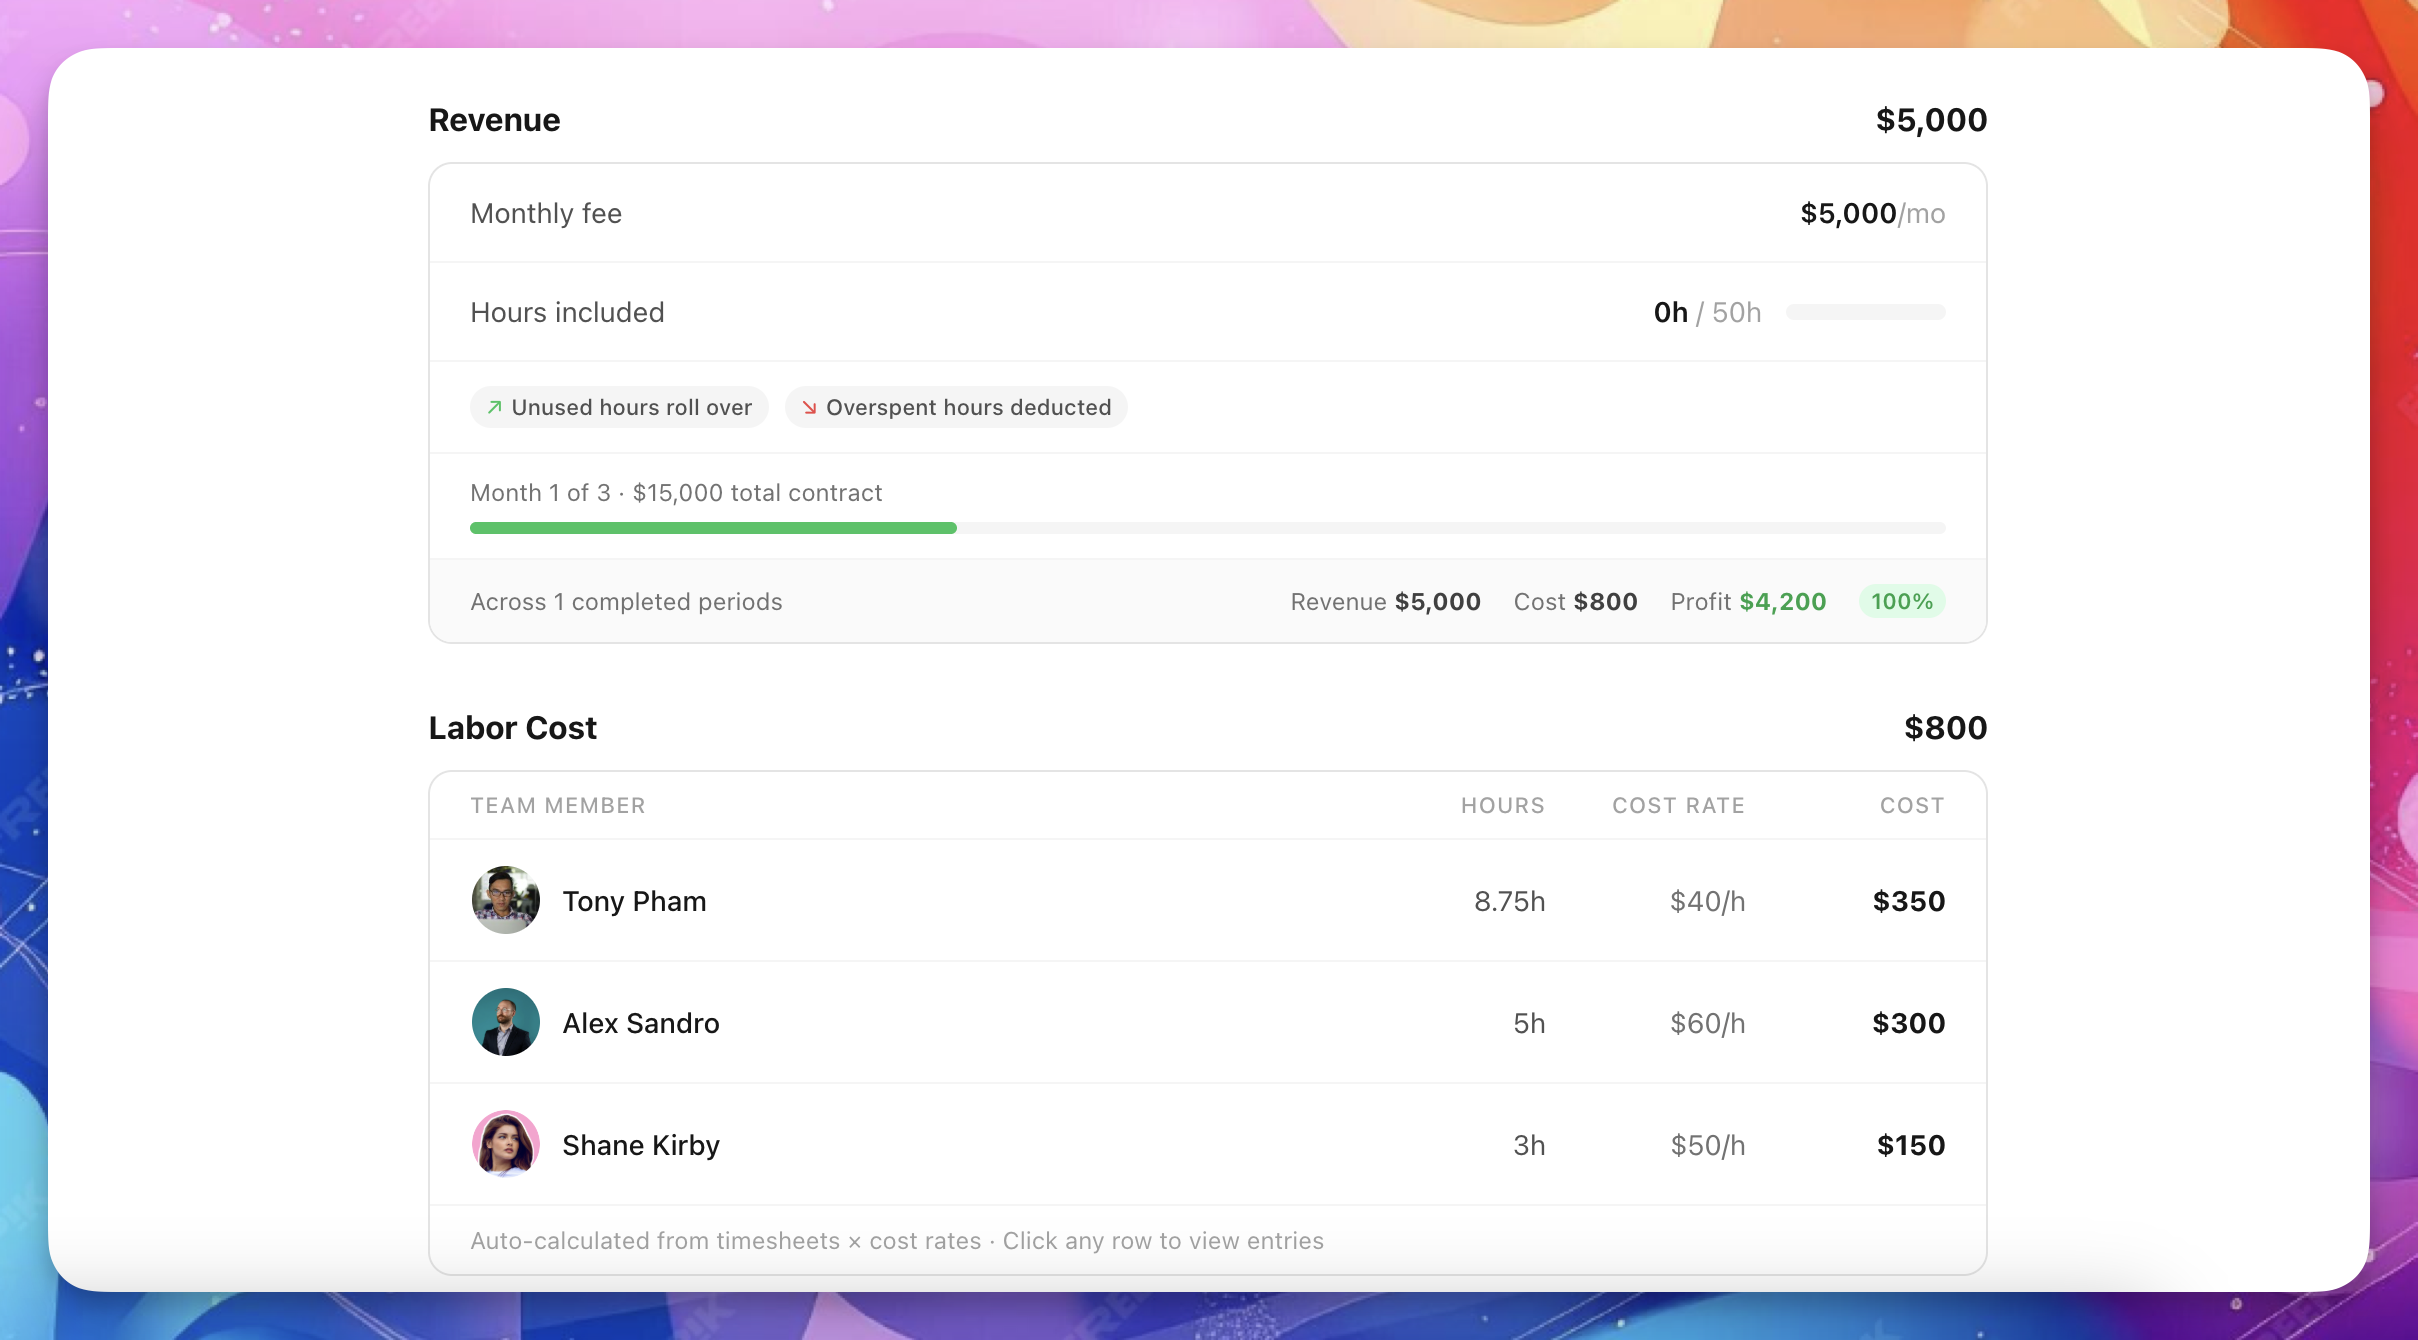
Hour rollover
If you enabled Roll over unused hours or Deduct overspent hours in the retainer setup, hours carry between billing cycles.
Important: The hour cap counts billable hours only. Non-billable hours (internal meetings, admin work) are not counted against the retainer's included hours. They still appear in Labor Cost and affect your profit margin, but they don't eat into the client's purchased hours.
How it works:
- When a billing cycle ends, its hours are finalized. The system records how many hours were used, how many were unused, and the rollover amount.
- That rollover amount becomes a fixed input for the next cycle's hour cap.
- Past cycles don't recalculate. If you add a backdated time entry to a closed cycle, it updates that cycle's labor cost (for accurate profit), but the rollover amount stays the same.
For example: Cycle 1 included 40h, your team used 35h. The 5h rollover is locked. Cycle 2 starts with 45h (40h included + 5h rolled over). If you later add 3h to Cycle 1, the cost updates but Cycle 2 still shows 45h — the rollover doesn't change.
This keeps past financial data stable and predictable.
Timesheet side panel
Click any team member row in the Revenue section to open a side panel showing their individual time entries.
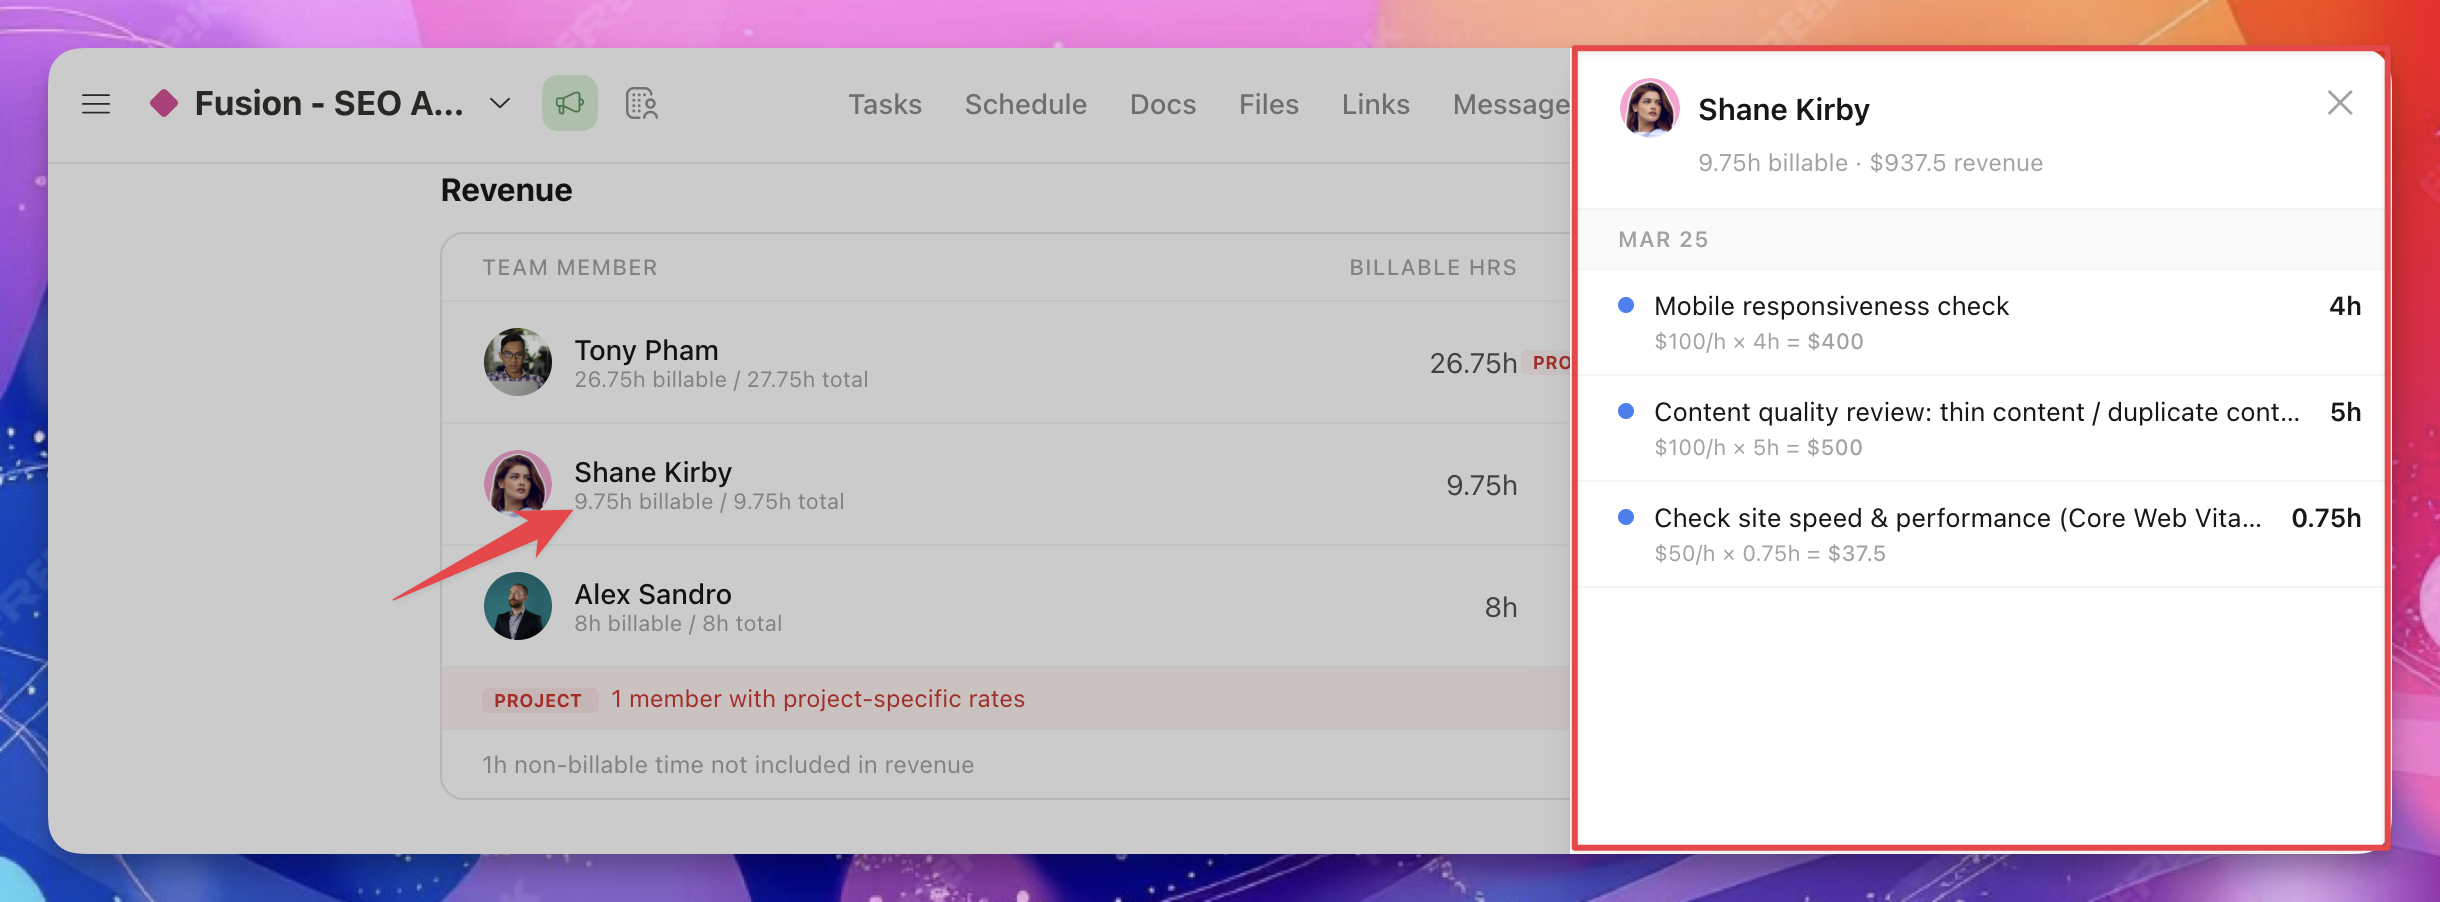
Each entry shows Billable entries (blue dot) — with rate × hours = revenue
Labor Cost section
This section shows the cost of your team's time on this project.
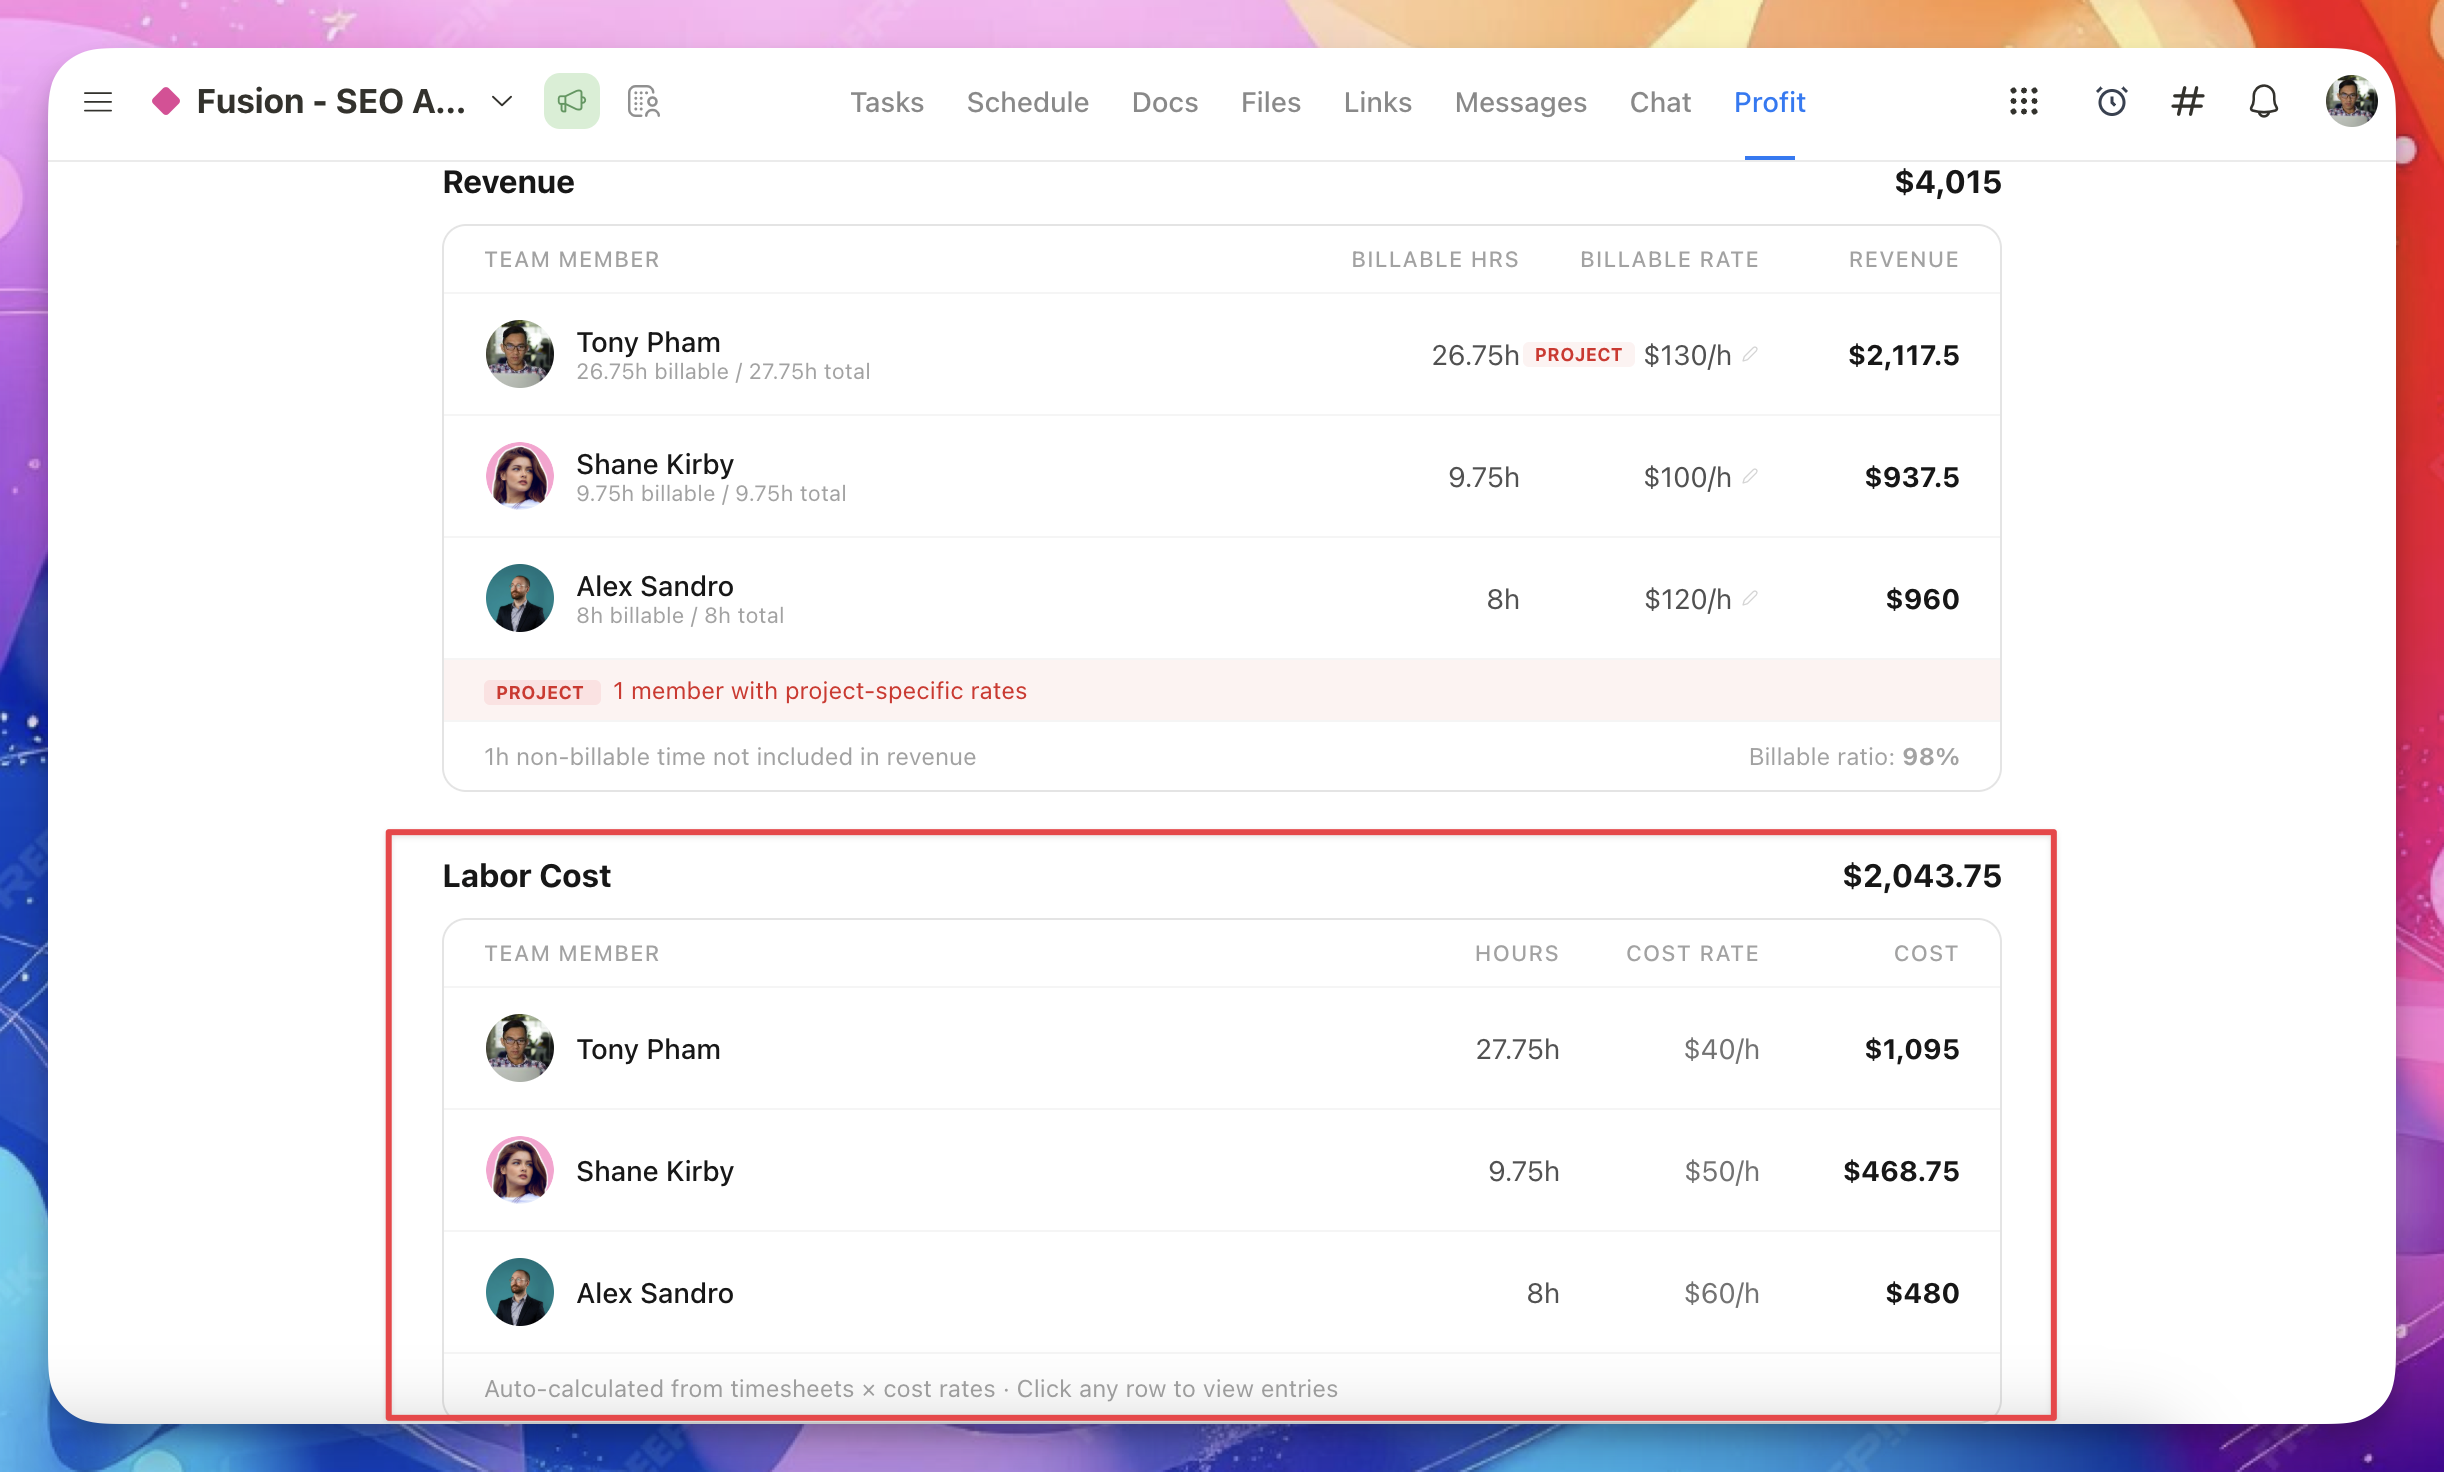
Each team member row shows:
- Hours logged
- Cost — calculated from hours × cost rate
Note: If a team member's cost rate was changed during the project, past time entries keep their original rate. The cost column reflects the actual blended cost, which may not equal the current rate × total hours. Learn more about how rates work.
Manage rates
Click Manage rates in the footer of the Labor Cost section to go directly to Settings → Members where you can update rates.
You can also find this link in the Settings dropdown at the top of the Profit page.
Expenses
Add project expenses like software, stock photos, or contractor costs.
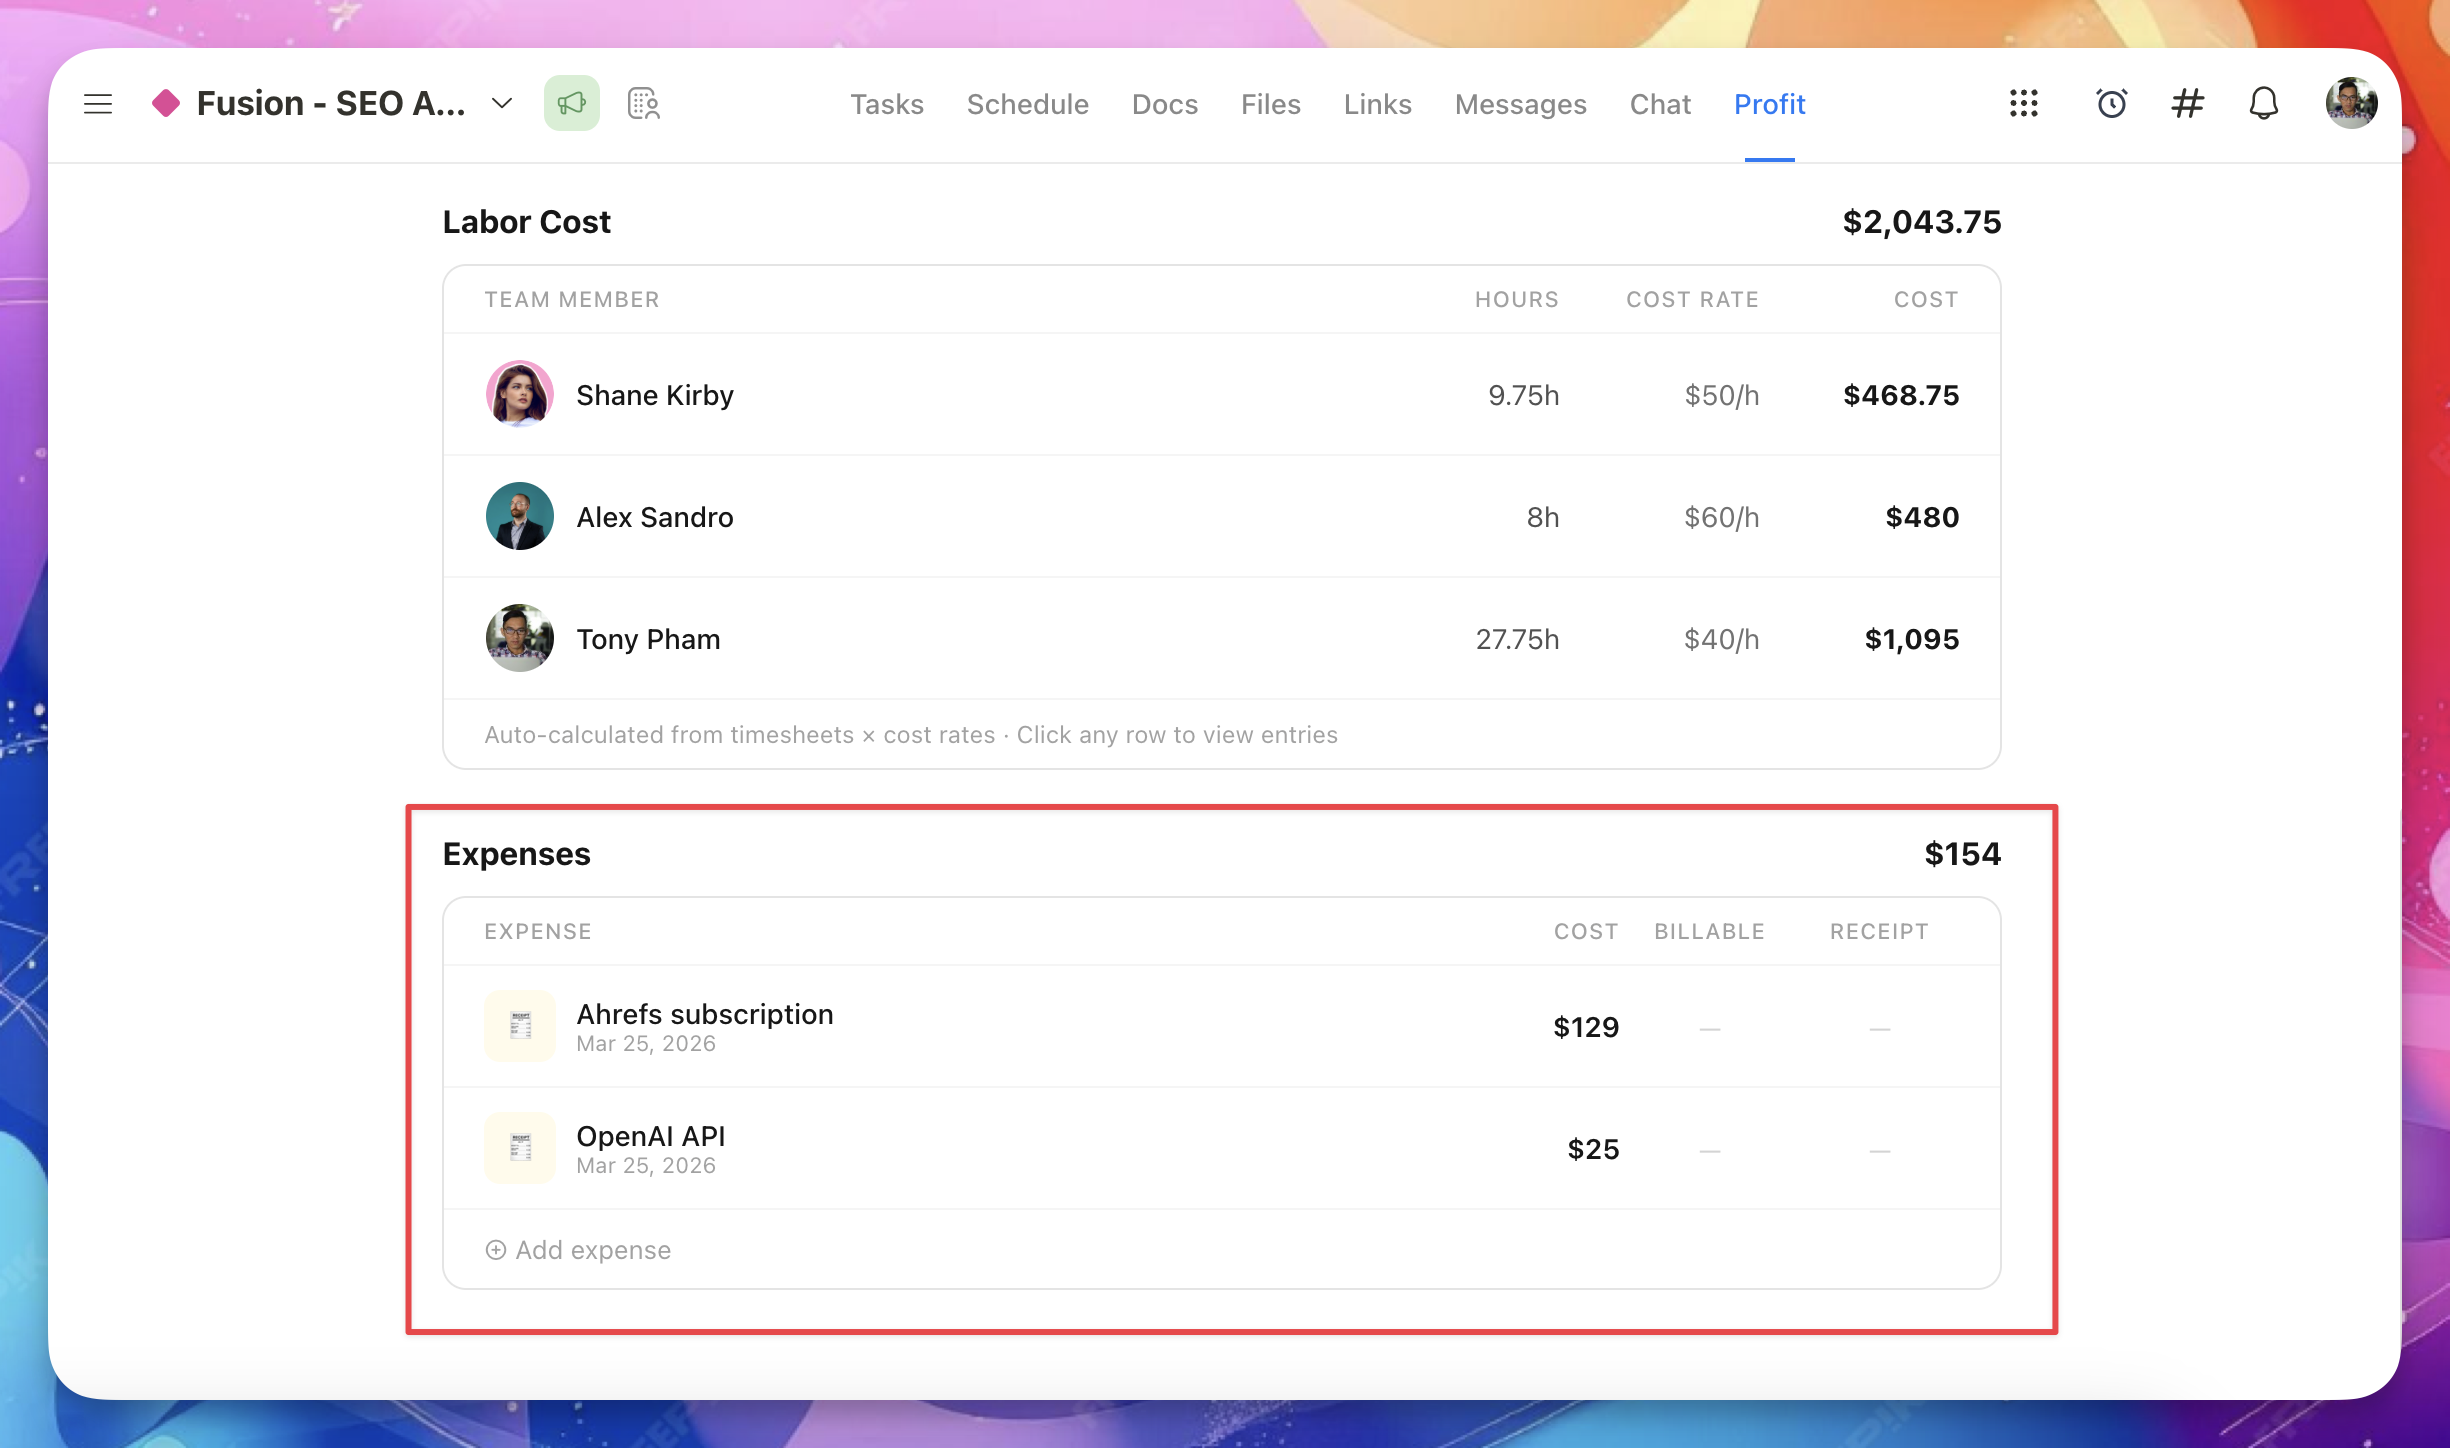
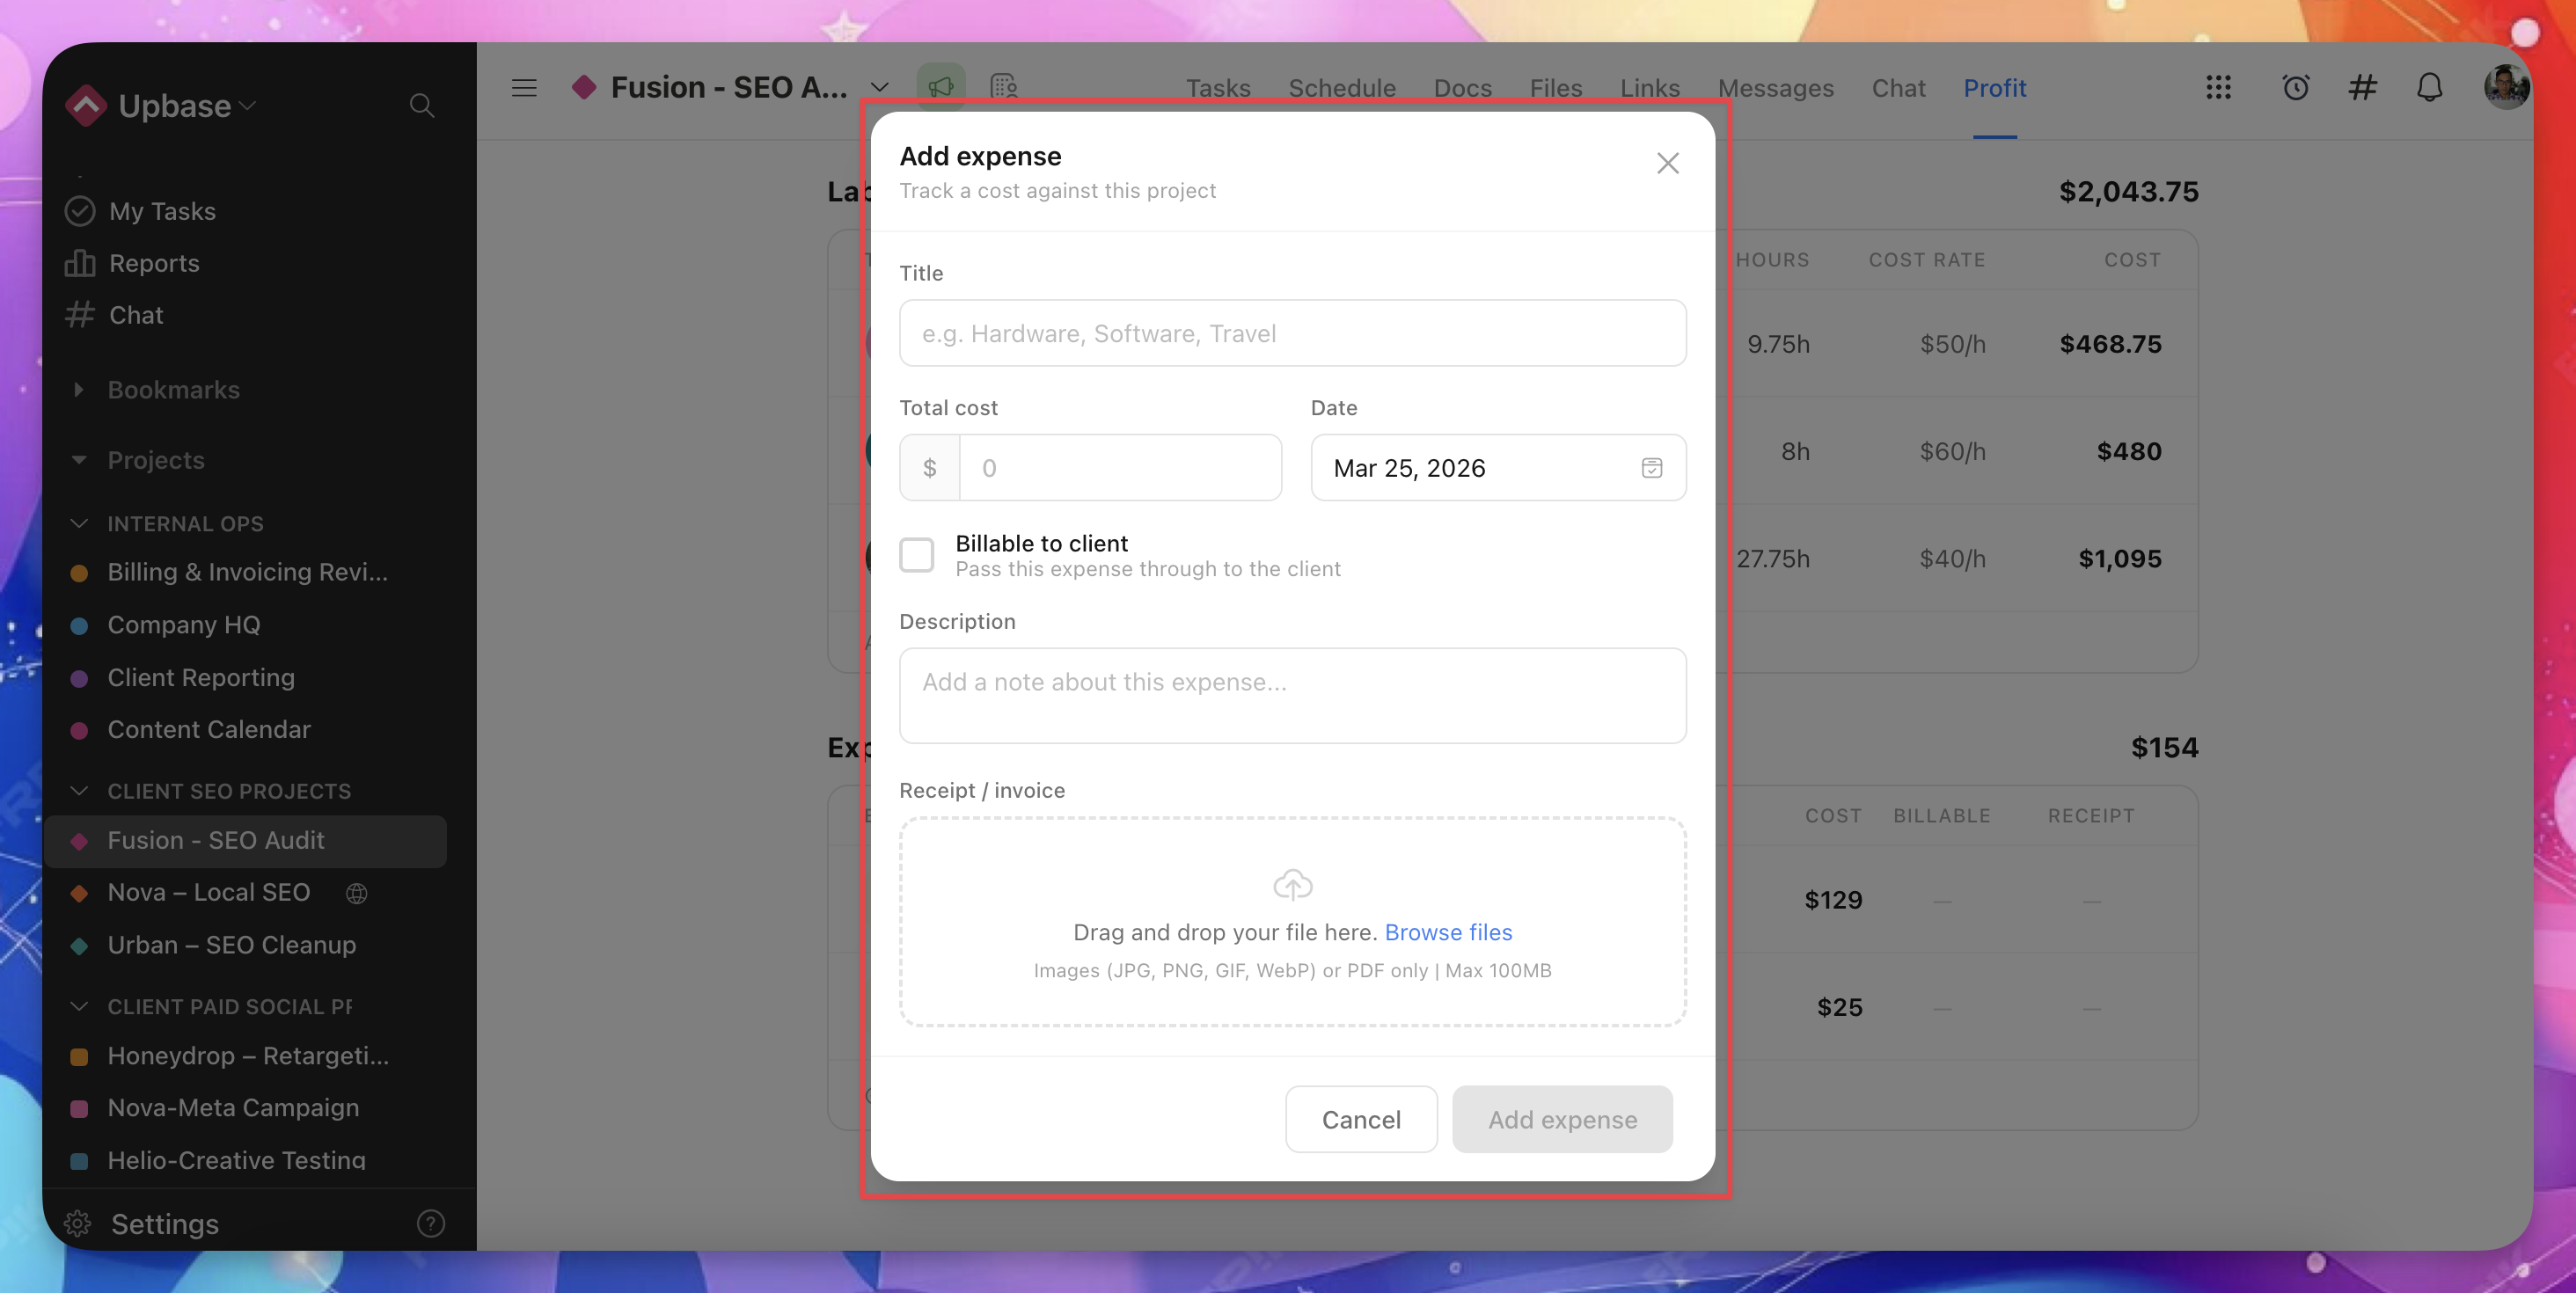
Add an expense
- Click Add expense in the Expenses section.
- Enter a title and amount (required).
- Set the date (required).
- Optionally mark it as billable and set a markup percentage.
- Add a description and receipt (up to 4 files, 100MB each).
- Click Save.
Billable expenses
When you mark an expense as billable:
- The expense cost is passed through to the client
- You can add a markup percentage (e.g., 15%)
- The billable amount is added to your project's revenue
For example: A $100 expense with 15% markup adds $115 to revenue and $100 to costs.
Edit or delete expenses
Click any expense row to open it in edit mode. You can update the details or click Delete expense to remove it.
Project-specific billable rates
For hourly projects, you can override a team member's workspace billable rate for a specific project.
Set a project-specific rate
- In the Revenue section, click the rate next to a team member's name (the pencil icon).
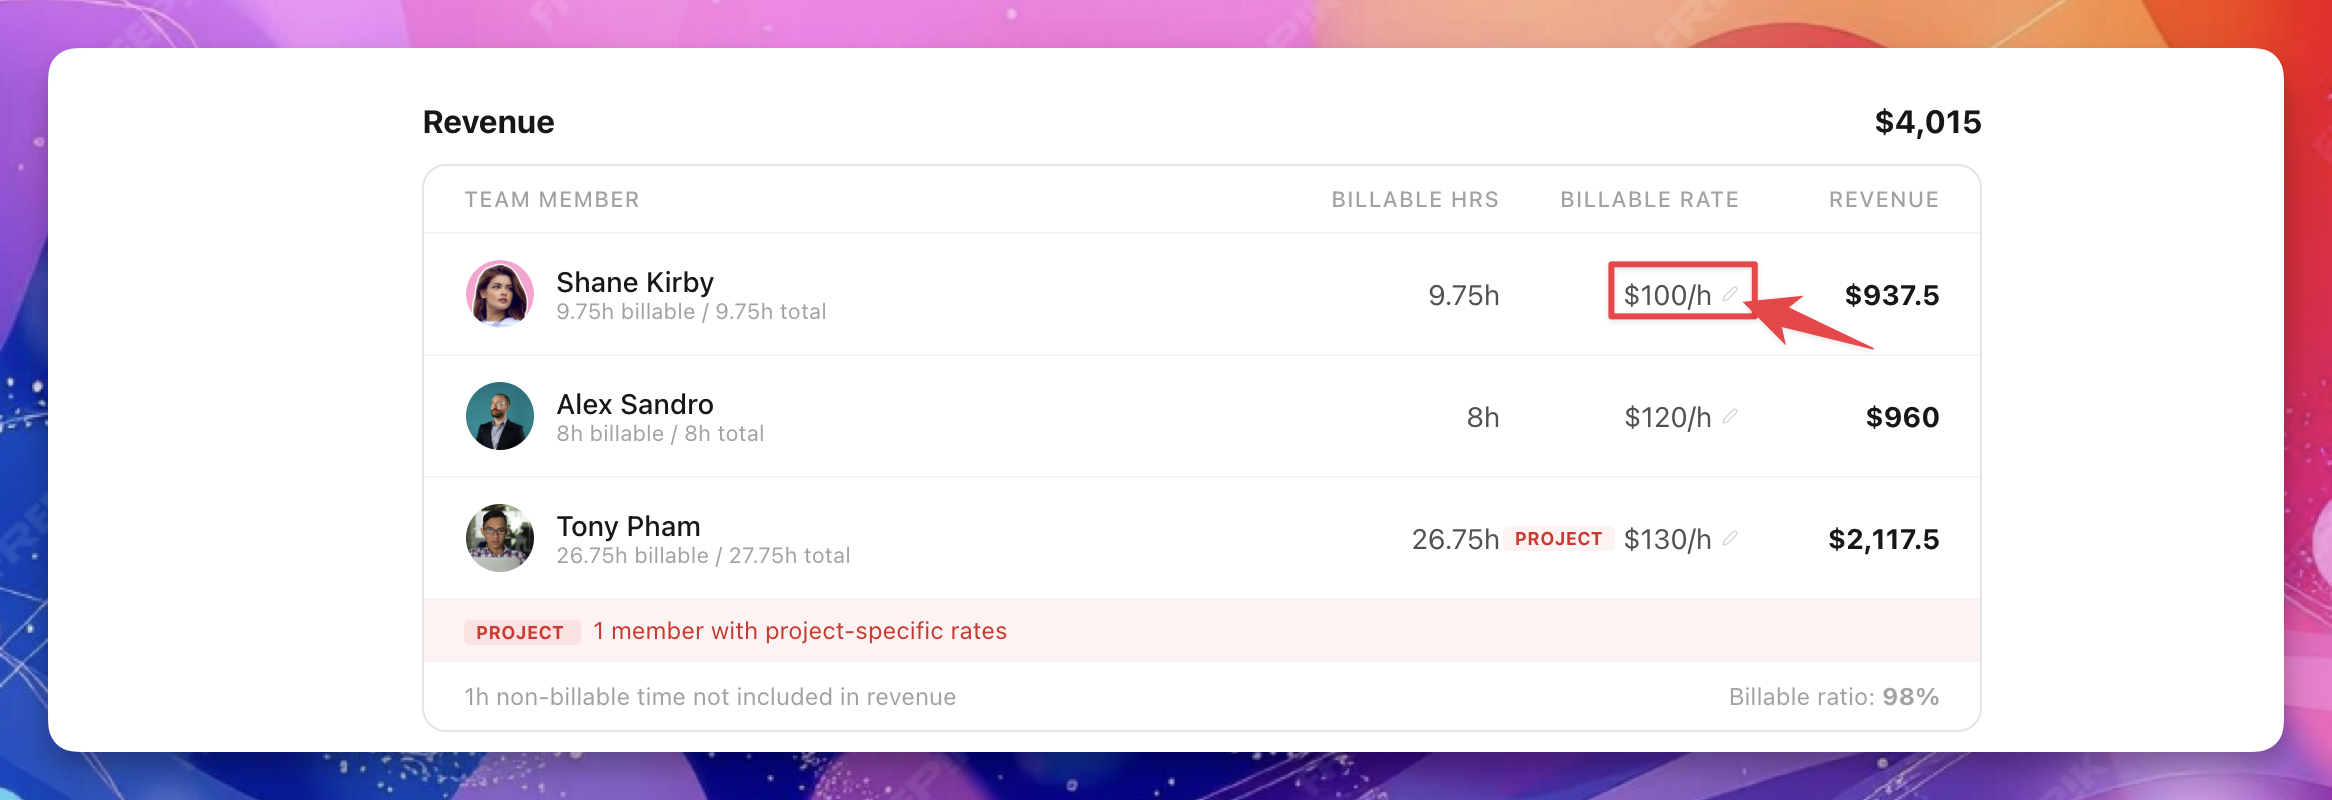
- The rate override modal opens.
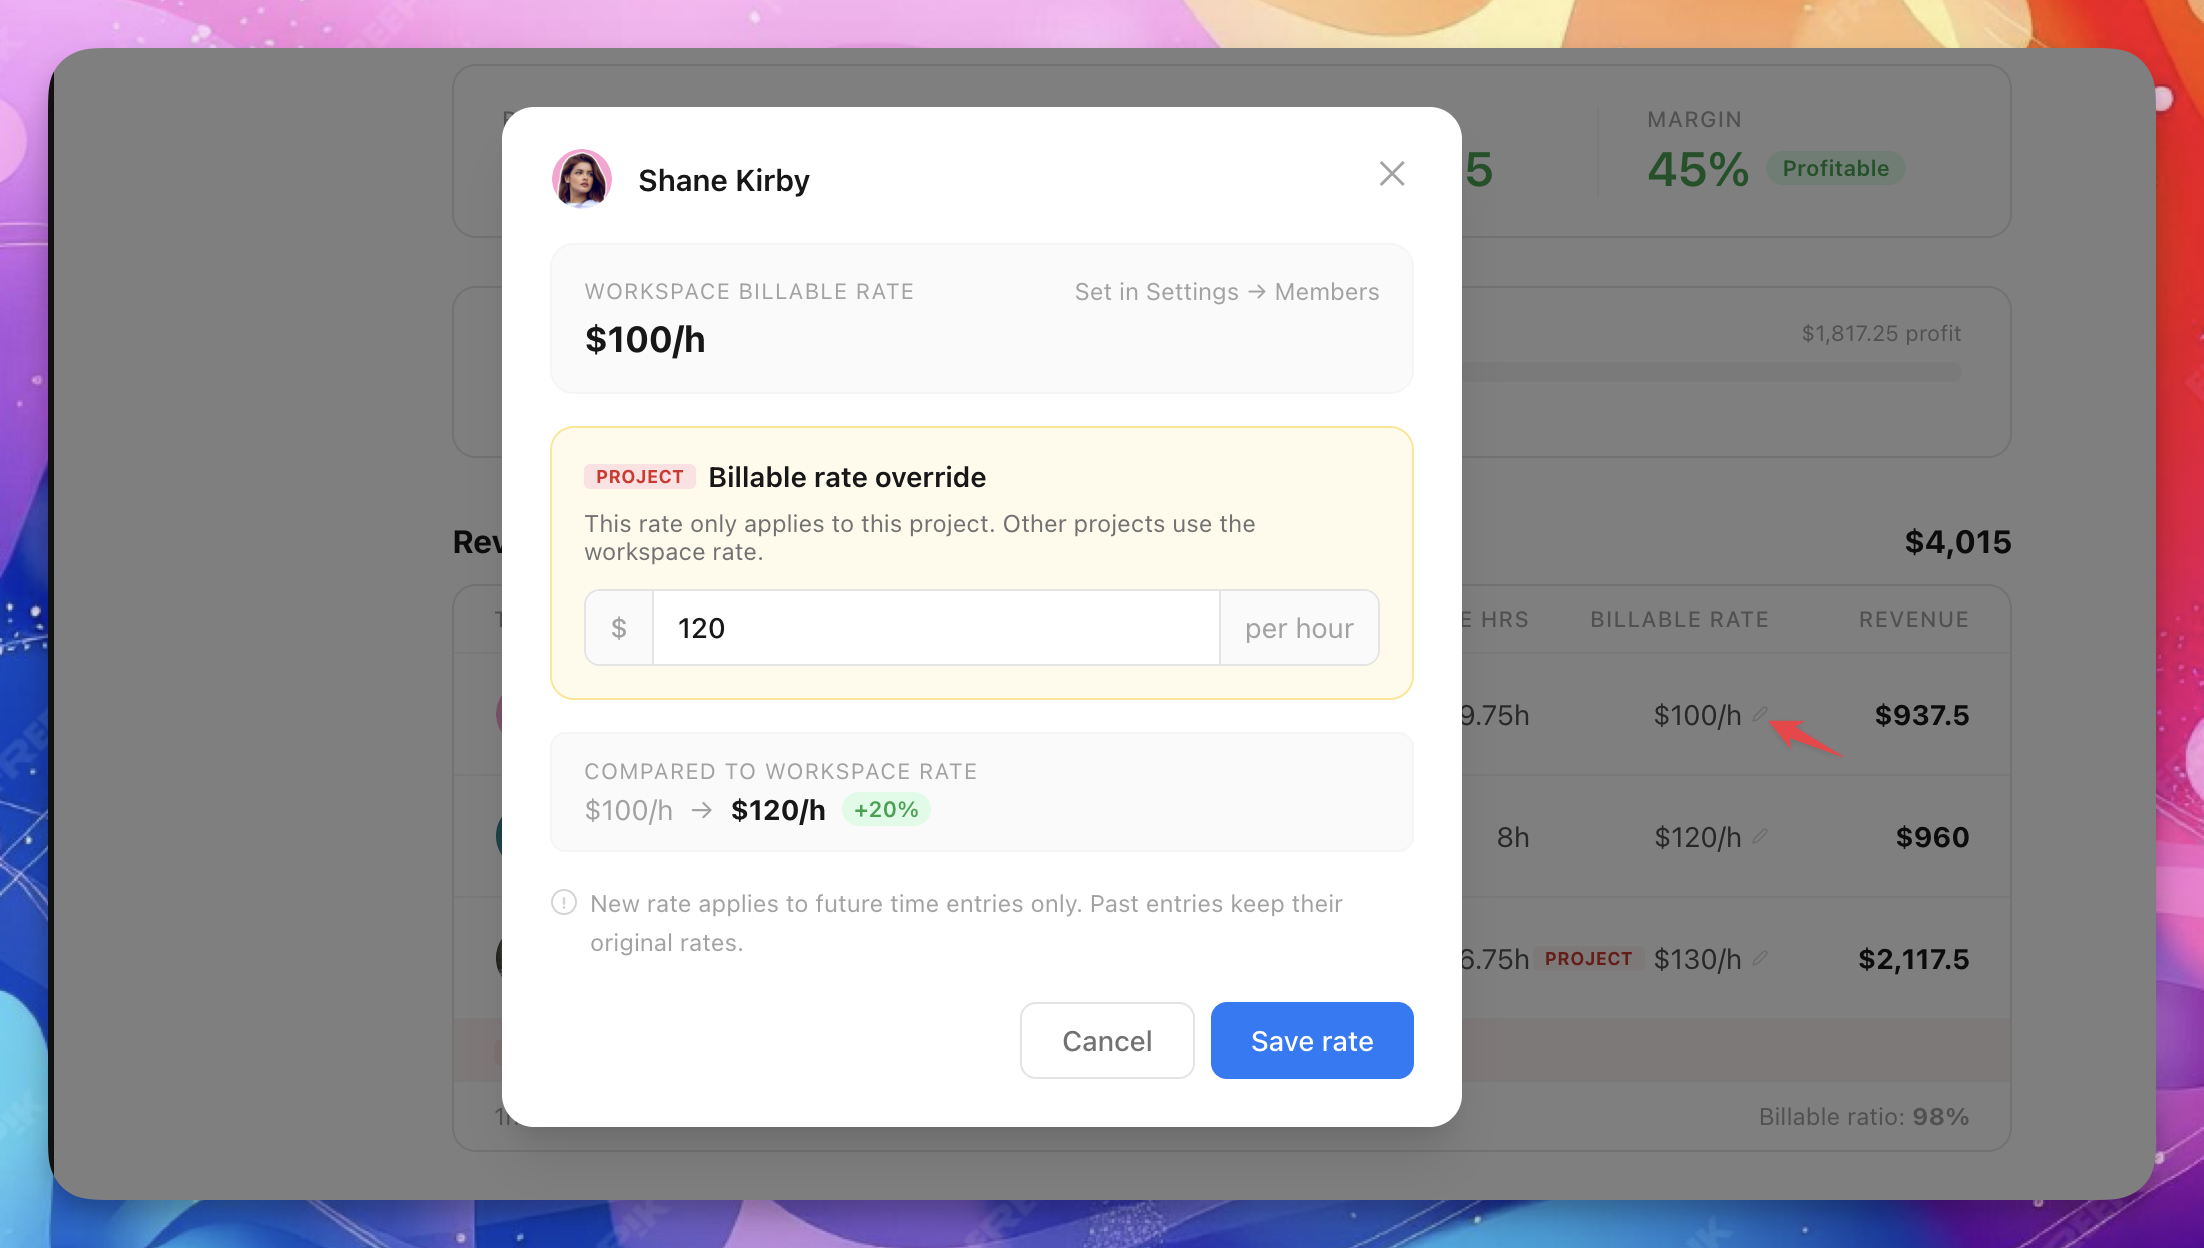
- Enter the new rate for this project.
- Click Save rate.
The modal shows:
- The workspace rate for reference
- A comparison showing the difference (amount and percentage)
- The forward-only notice — new rate applies to future entries only
Remove an override
Open the override modal and click Remove override at the bottom-left. The member reverts to their workspace rate for future entries.
Overridden rates show an amber PROJECT badge in the Revenue table.
Client-level profit
The Profitability tab on a client page shows profit rolled up across all projects for that client.
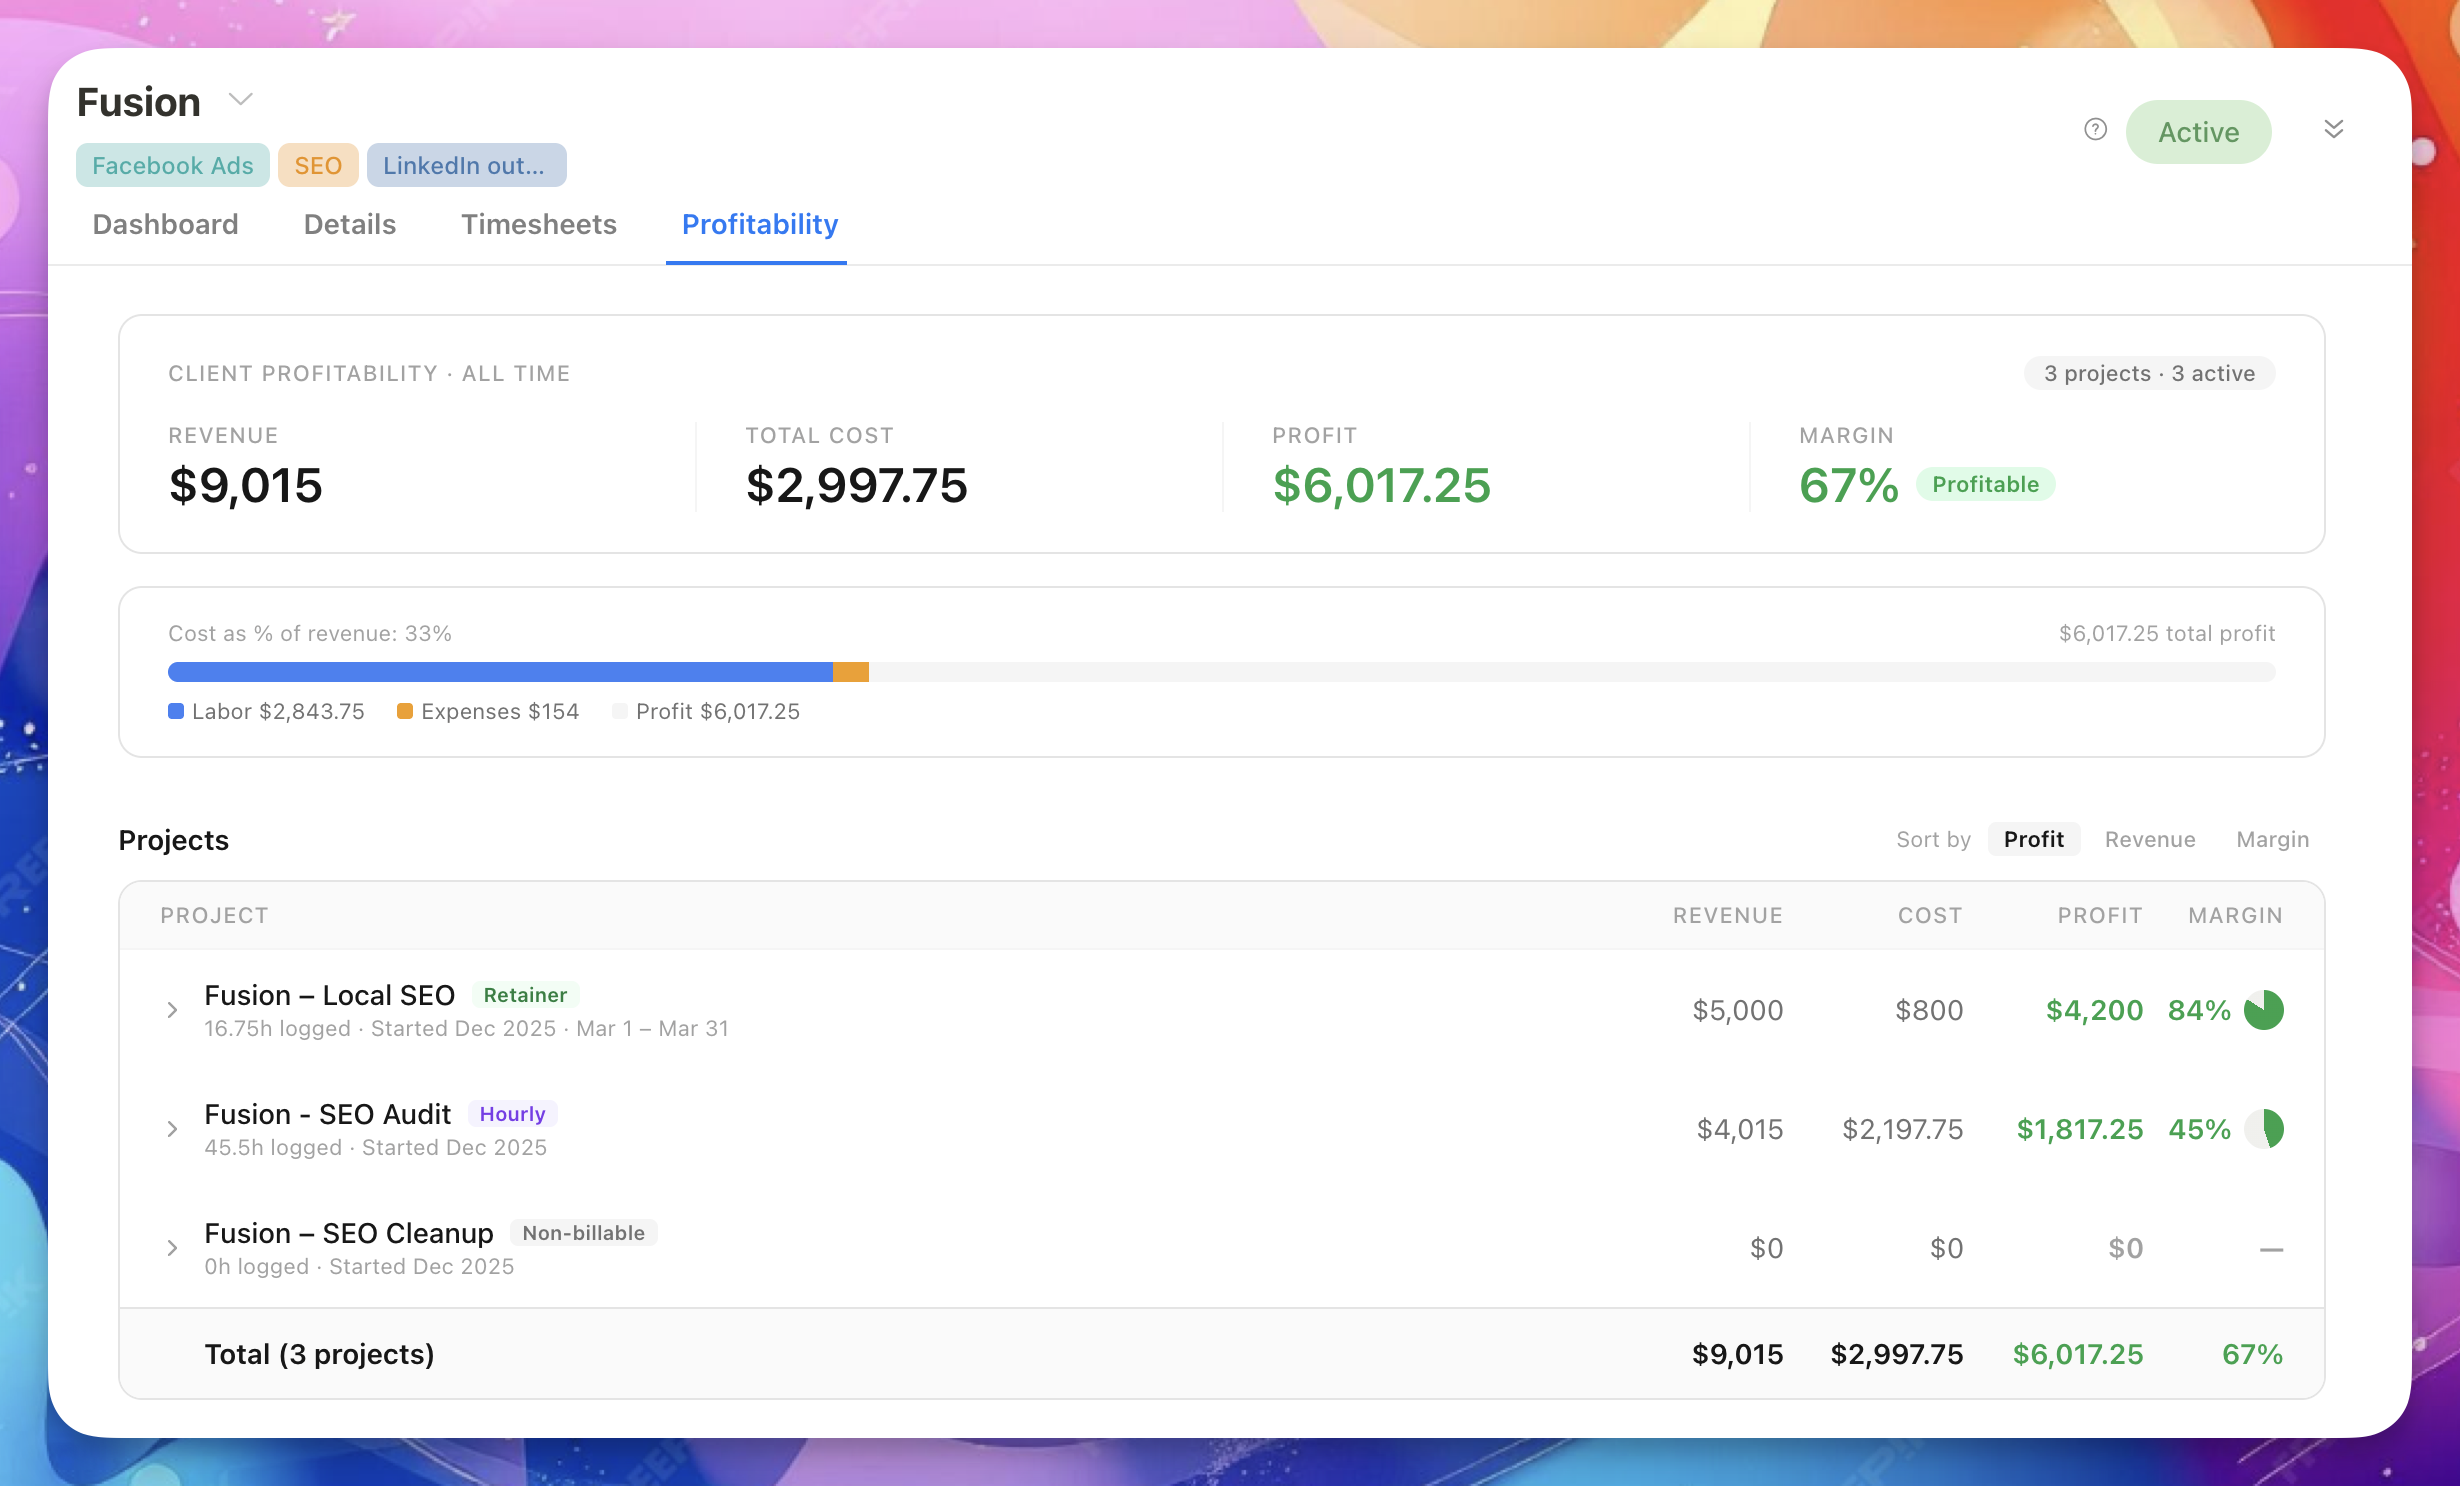
This is a read-only rollup view. All data flows automatically from the project-level Profit tabs. You don't enter anything here.
Time period (soon)
Click the "Client Profitability · All Time" label at the top of the summary to open a dropdown. You can choose:
- All time (default) — lifetime profitability across all projects for this client
- A specific month — shows data for that month only (last 6 months available)
All time is the right default for understanding whether the client relationship is worth it overall. Use the monthly view to spot trends — for example, if a client that was profitable for months is now trending toward a loss.
What you see
- Client profitability summary — revenue, cost, profit, and margin across all projects for the selected period
- Project breakdown — each project with its billing type, revenue, cost, profit, and margin. Click to expand and see details. Sortable by profit, revenue, or margin.
- Team — aggregated hours and cost per team member across all client projects
- Expenses — rolled up per project (manage individual expenses at the project level)
Non-billable projects
Non-billable projects show "—" for revenue and margin. Their costs are included in Total Cost and reduce overall profit, with a separate callout below the summary.
Profitability report
The workspace-level Profitability Report shows profit across all projects and clients.
Go to Reports → Profitability to access it.
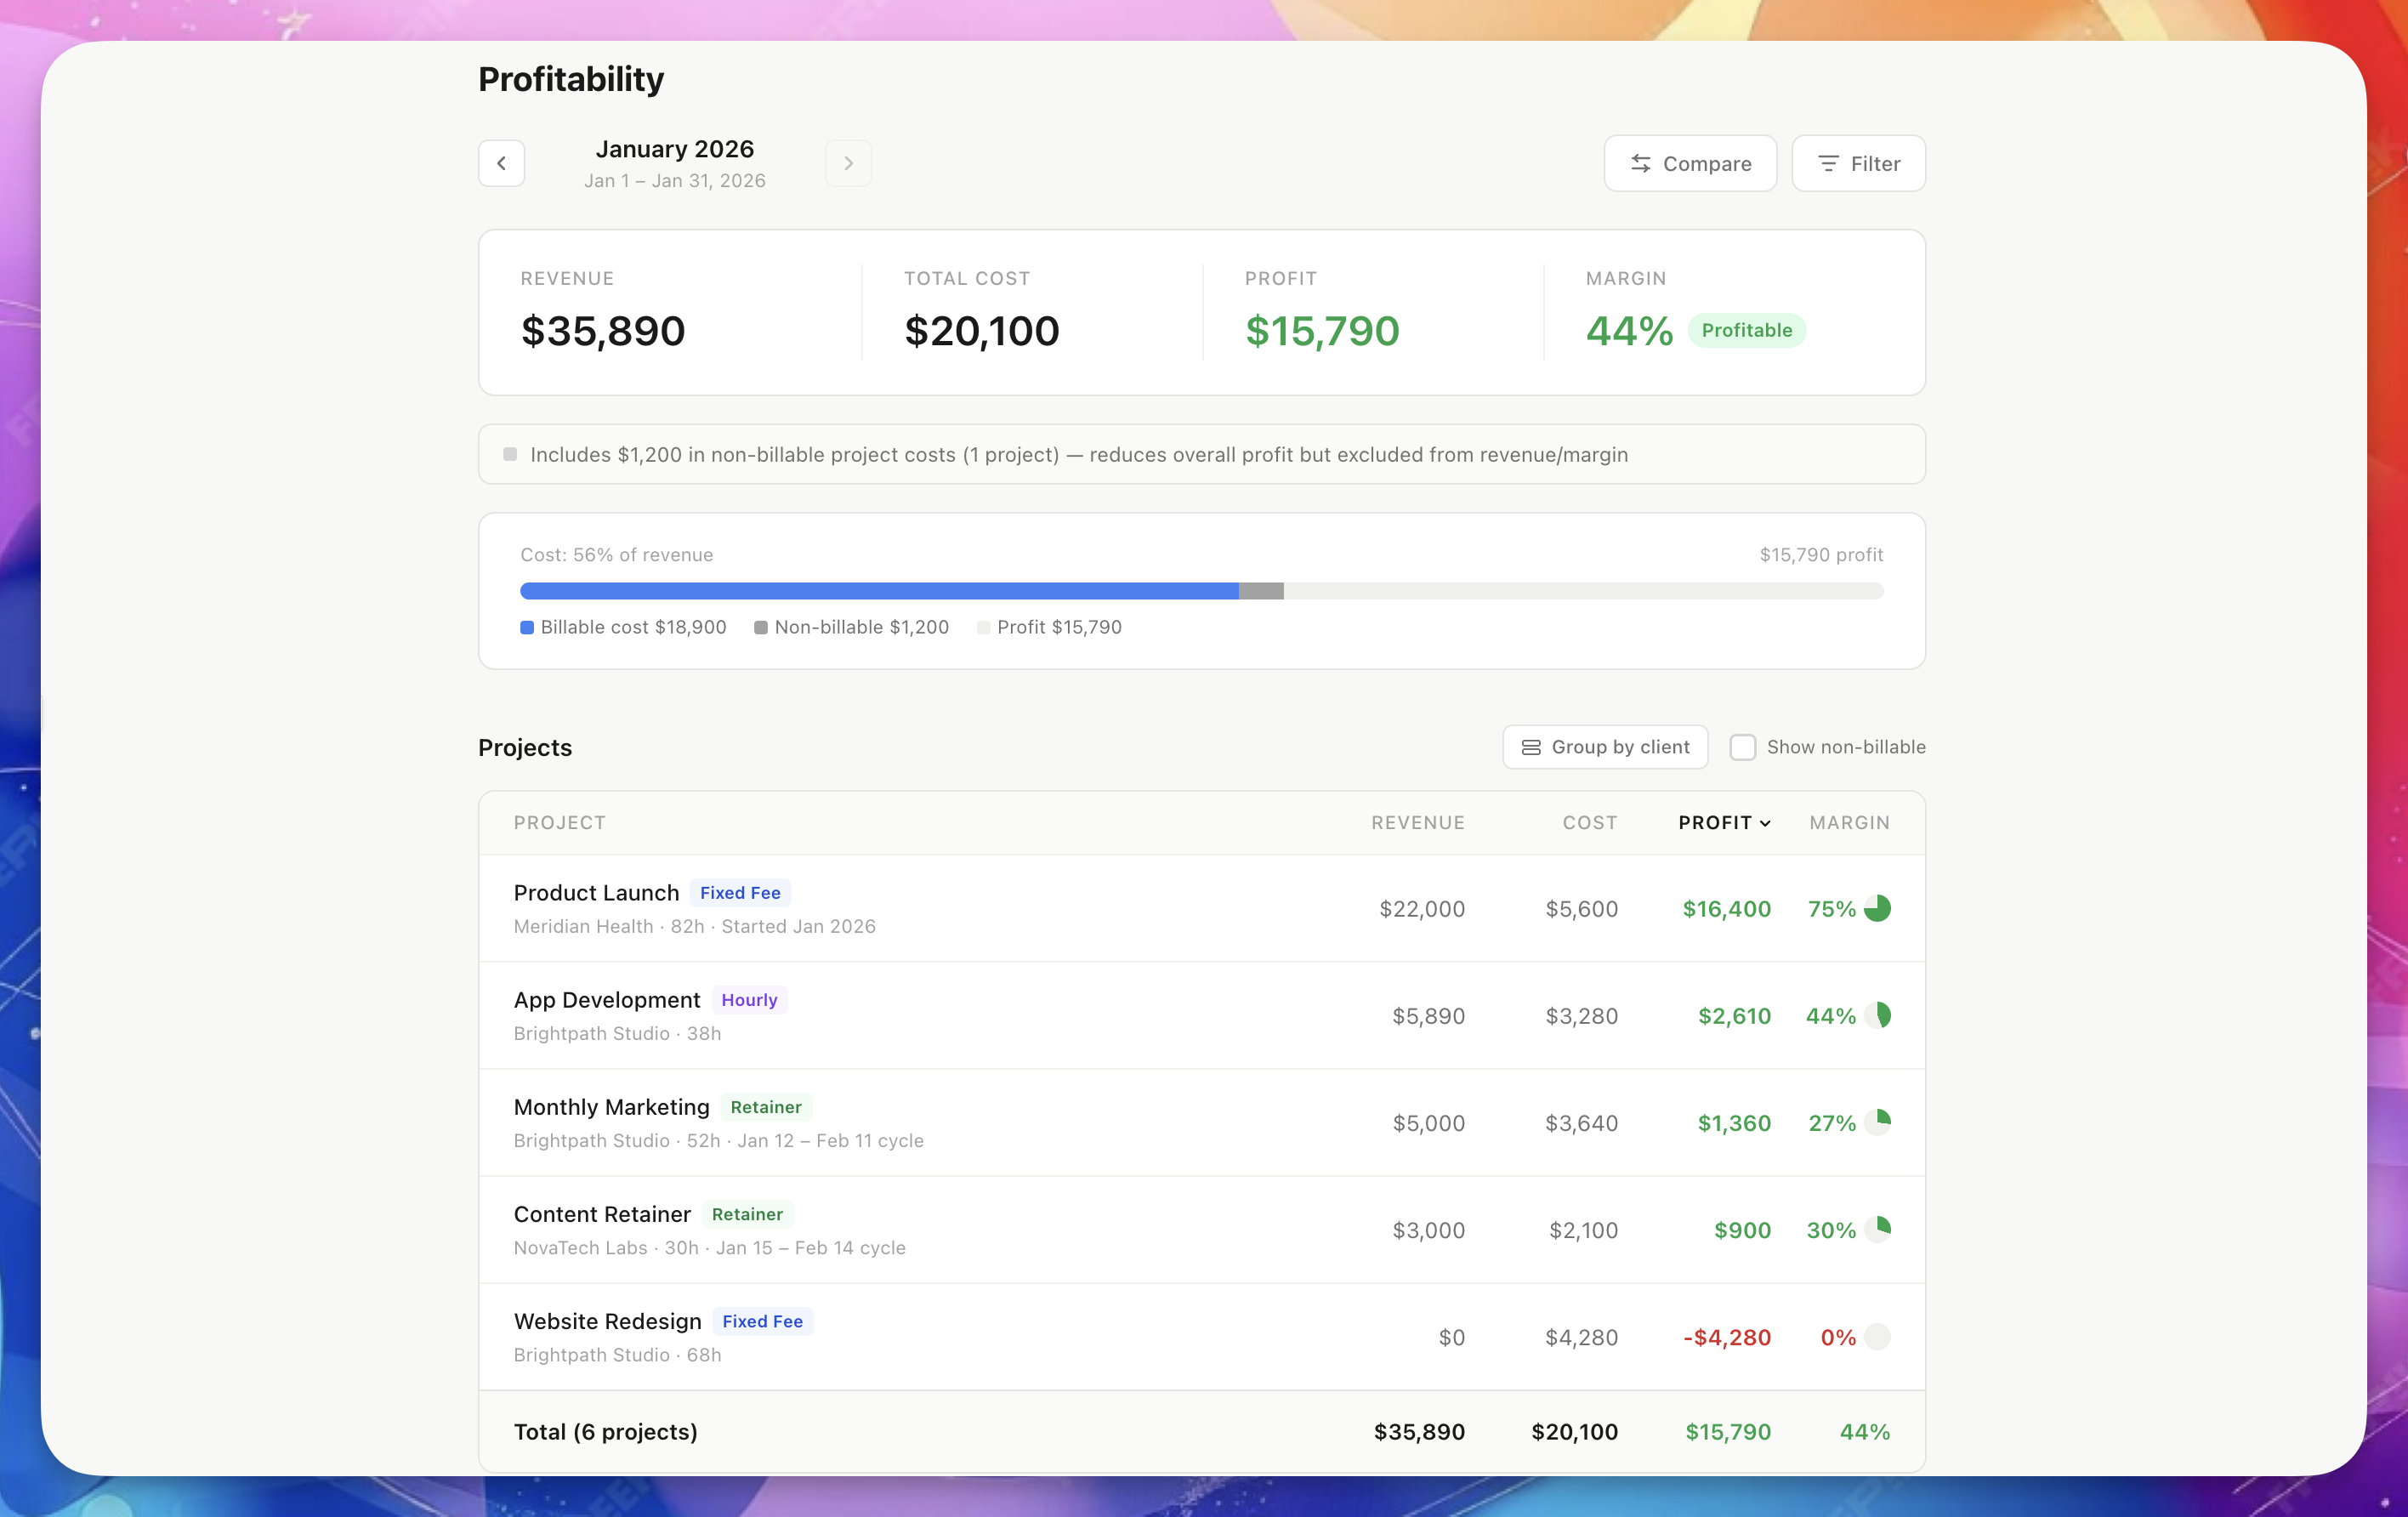
Time period
The report shows data one month at a time.
Use the left and right arrows next to the month name to navigate between months. You can't go past the current month.
Revenue attribution
How revenue appears in each month depends on the billing type:
- Fixed fee (with start date): The full fee shows in the month the project started. The start date used is the one that existed when you set the billing type to Fixed Fee. If you change the project start date later, the revenue does not move — it stays locked to the original month.
- Fixed fee (no start date): If the project had no start date when you set the billing type, the full fee shows in the month the project was created. Setting a start date later does not change the revenue attribution.
- Hourly: Billable hours × billable rates for time logged in that month.
- Retainer: The billing cycle fee + billable expense markup, attributed to the month the cycle starts in. For example, a Jan 12 – Feb 11 cycle counts as January revenue.
- Non-billable: No revenue. Costs only.
Comparison mode
Click Compare to see how the current month compares to the previous month.
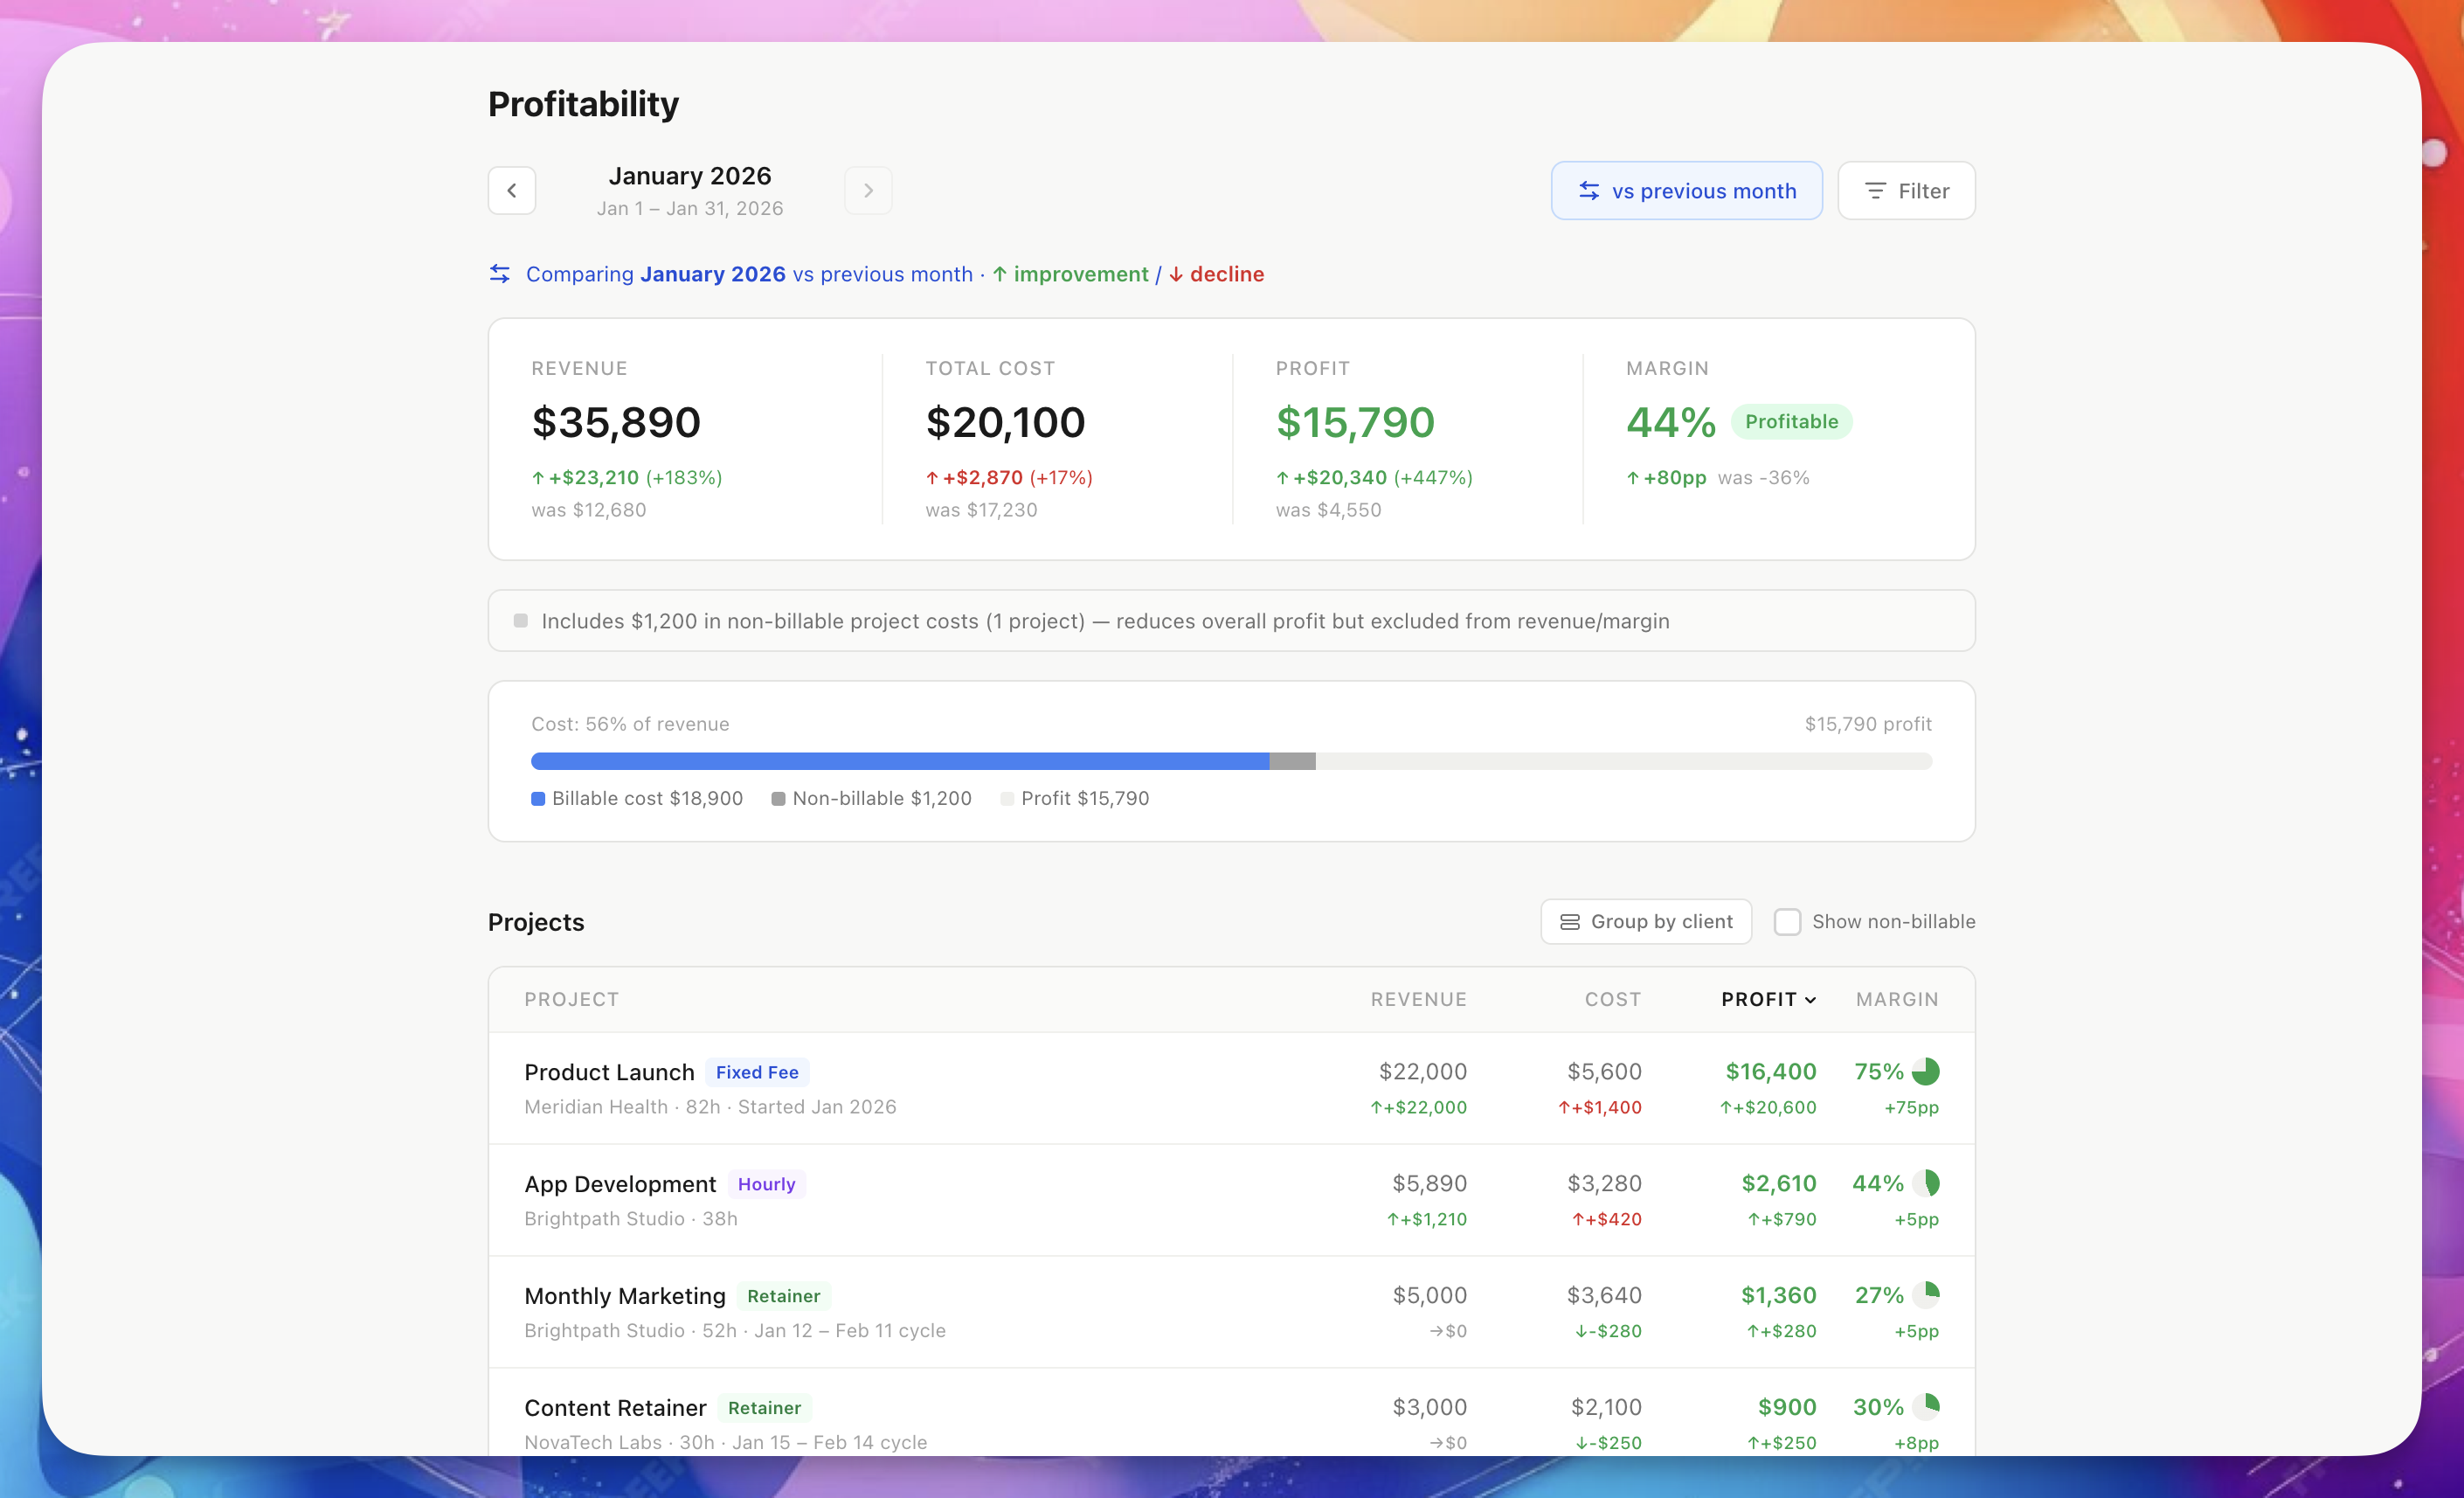
When comparison is active:
- Each metric shows the current value, the change (amount and percentage), and the previous value
- Green ↑ means improvement, red ↓ means decline
- For costs, lower is better (a cost decrease shows as green)
- Projects not present in the comparison period show a New badge
Filters
Click Filter in the top-right to open the filter bar. You can filter by:
- Client — show only projects for a specific client
- Project owner — show only projects owned by a specific team member
- Billing type — show only Fixed Fee, Retainer, Hourly, or Non-billable projects
Active filters show a blue badge count on the Filter button. Click Clear filters to reset.
Filters apply to both the current period and the comparison period.
Group by client
Click Group by client to cluster projects under their client with a summary showing each client's aggregate profit and margin.
Non-billable toggle
Use Show non-billable to include or exclude internal projects from the table. Non-billable project costs are always included in Total Cost but excluded from Revenue and Margin calculations.
How retainer revenue is attributed
When filtering by time period, retainer billing cycles are attributed to the month the cycle starts in.
For example, a billing cycle running Jan 12 – Feb 11 counts as January revenue. The table shows a note like "Jan 12 – Feb 11 cycle" so you know which cycle is counted.
How rates work (forward-only)
Rate changes in Upbase are forward-only:
- When you update a billable rate or cost rate, the new rate applies to future time entries only
- Past time entries keep their original rate
- This ensures historical data stays accurate
This applies to:
- Workspace-level rate changes (Settings → Members)
- Project-specific rate overrides
What about moved tasks?
Time entries are permanently tied to the project they were created in. Moving a task to a different project does not move its existing time entries.
- Time entries logged before the move stay with the original project and use that project's rates
- Time entries logged after the move belong to the new project and use the new project's rates
Tasks without a project: If you track time on a task before adding it to a project, those time entries are not counted for any project's profit calculation. Only entries created while the task belongs to a project are included.
Non-billable projects
Use the Non-billable billing type for internal projects with no revenue.
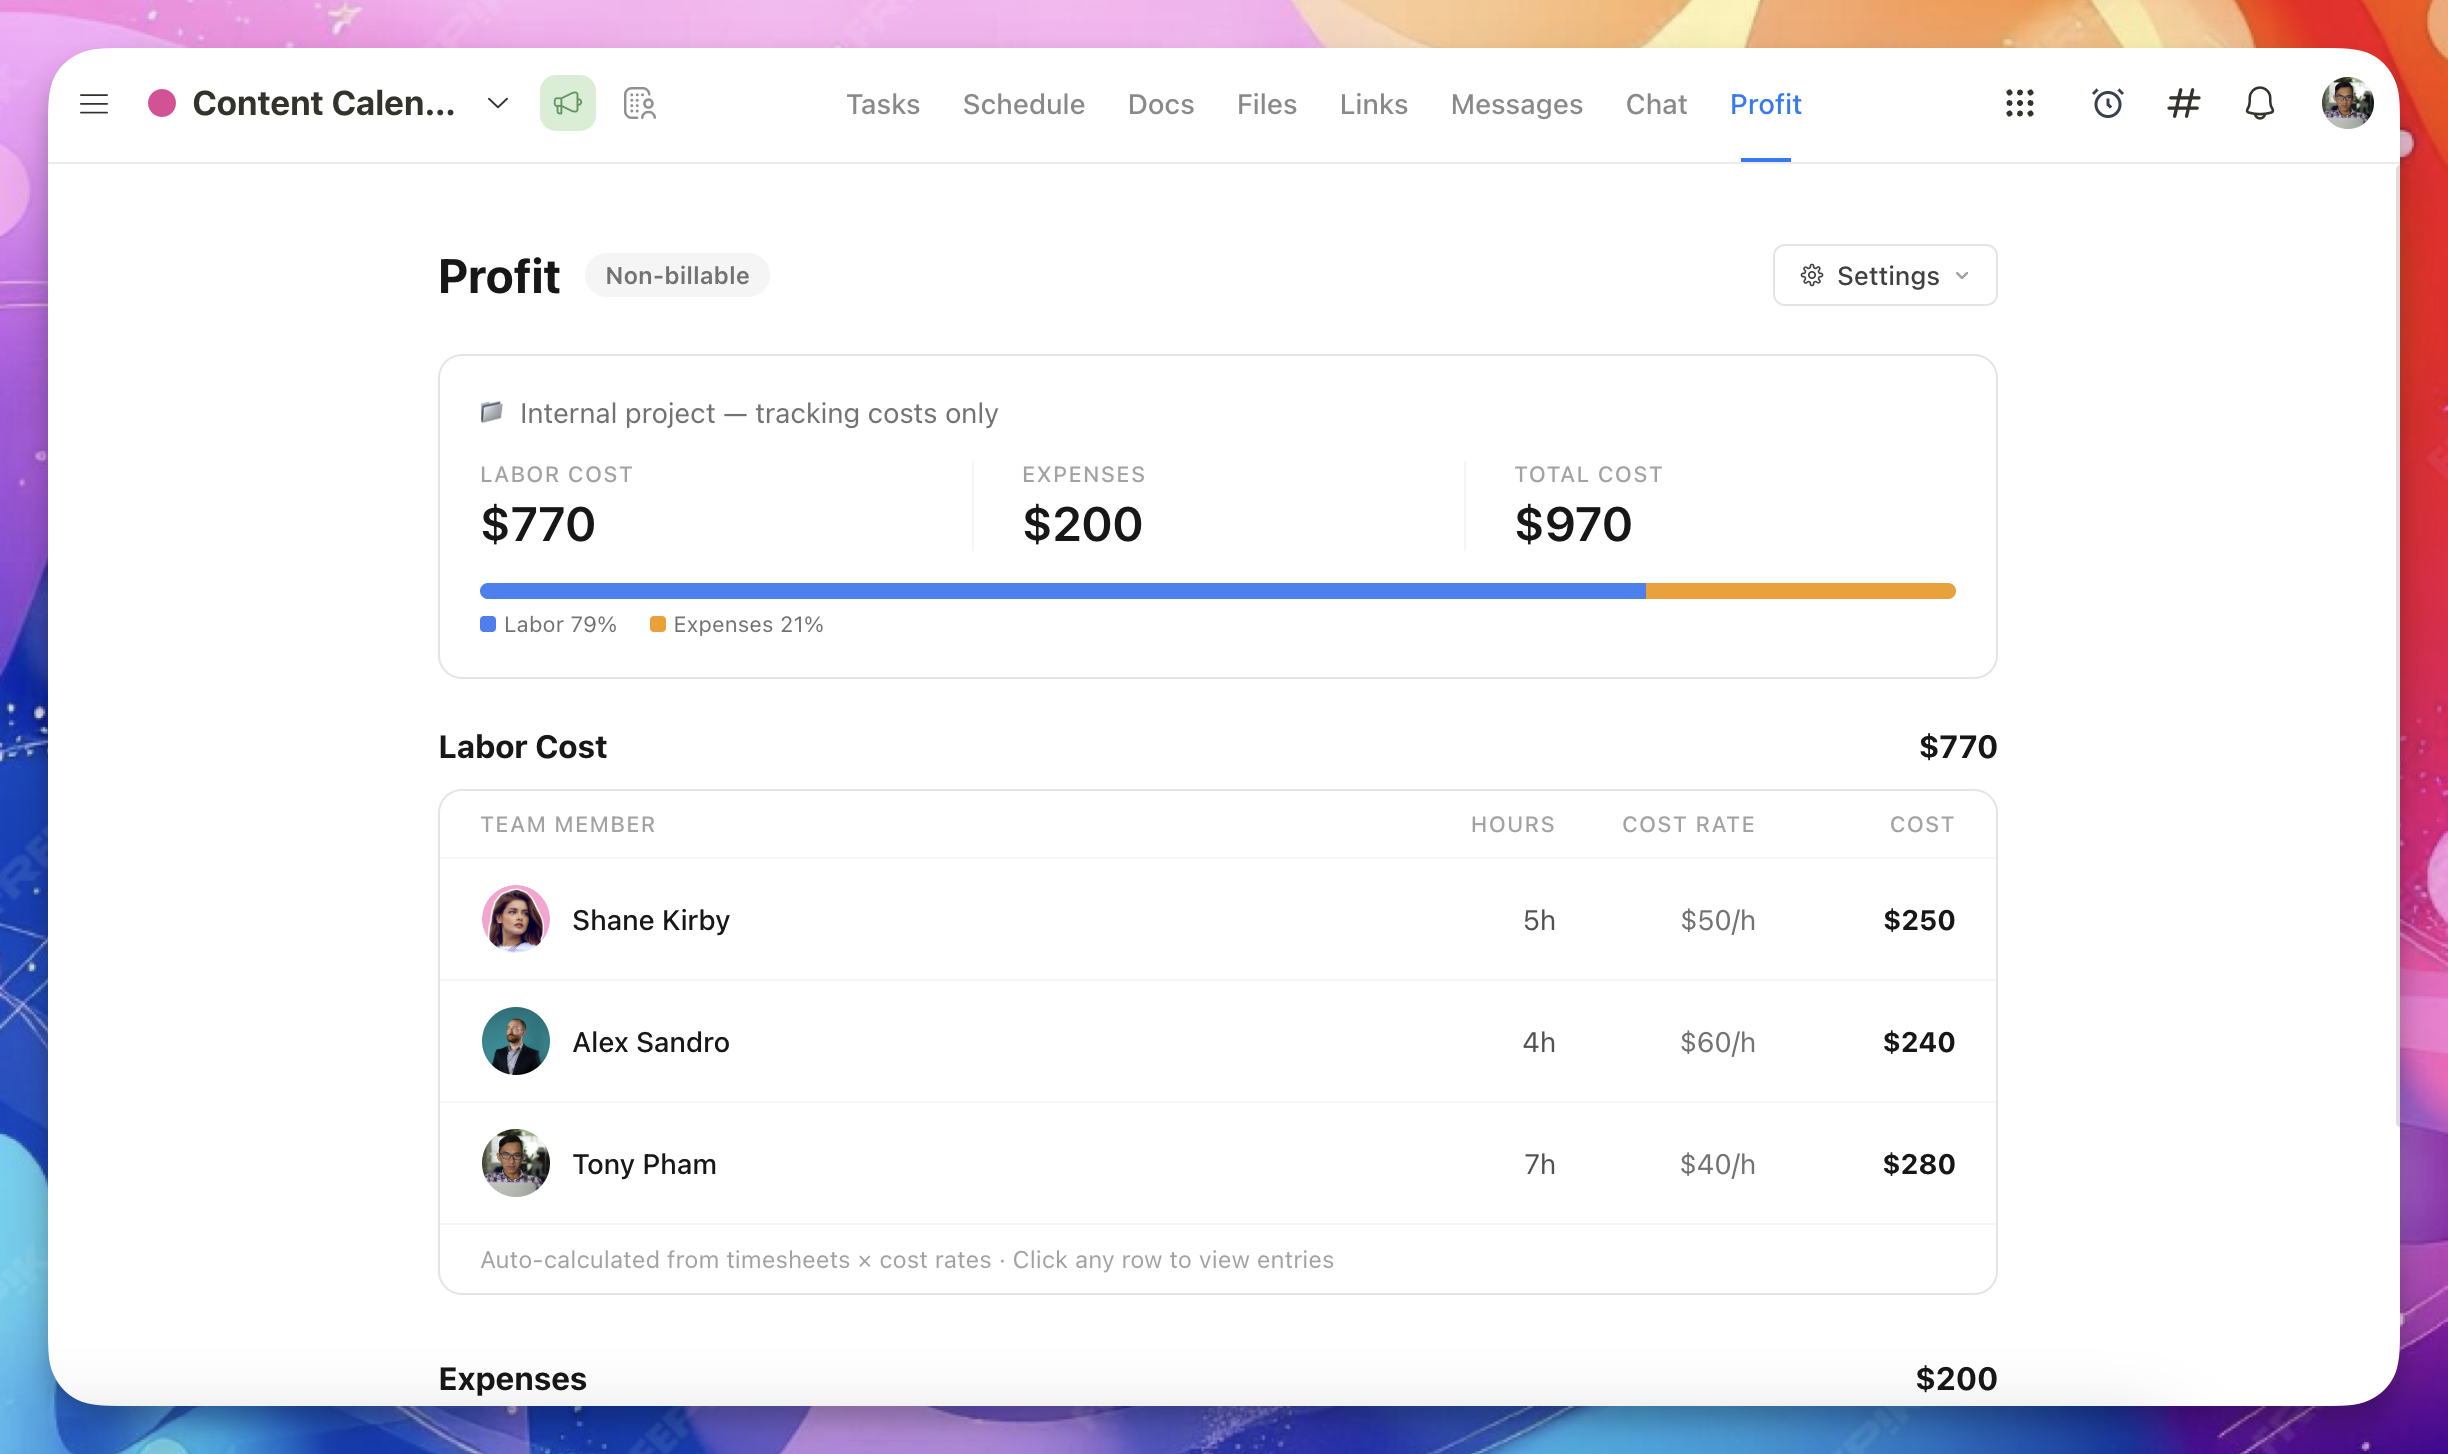
Non-billable projects show a cost-only dashboard:
- Labor Cost — from timesheets
- Expenses — direct project expenses
- Total Cost — labor + expenses
Revenue, profit, and margin are not shown (there's no revenue to measure against).
Non-billable project costs are included in workspace-level reports, with a separate callout showing how much they contribute to total cost.
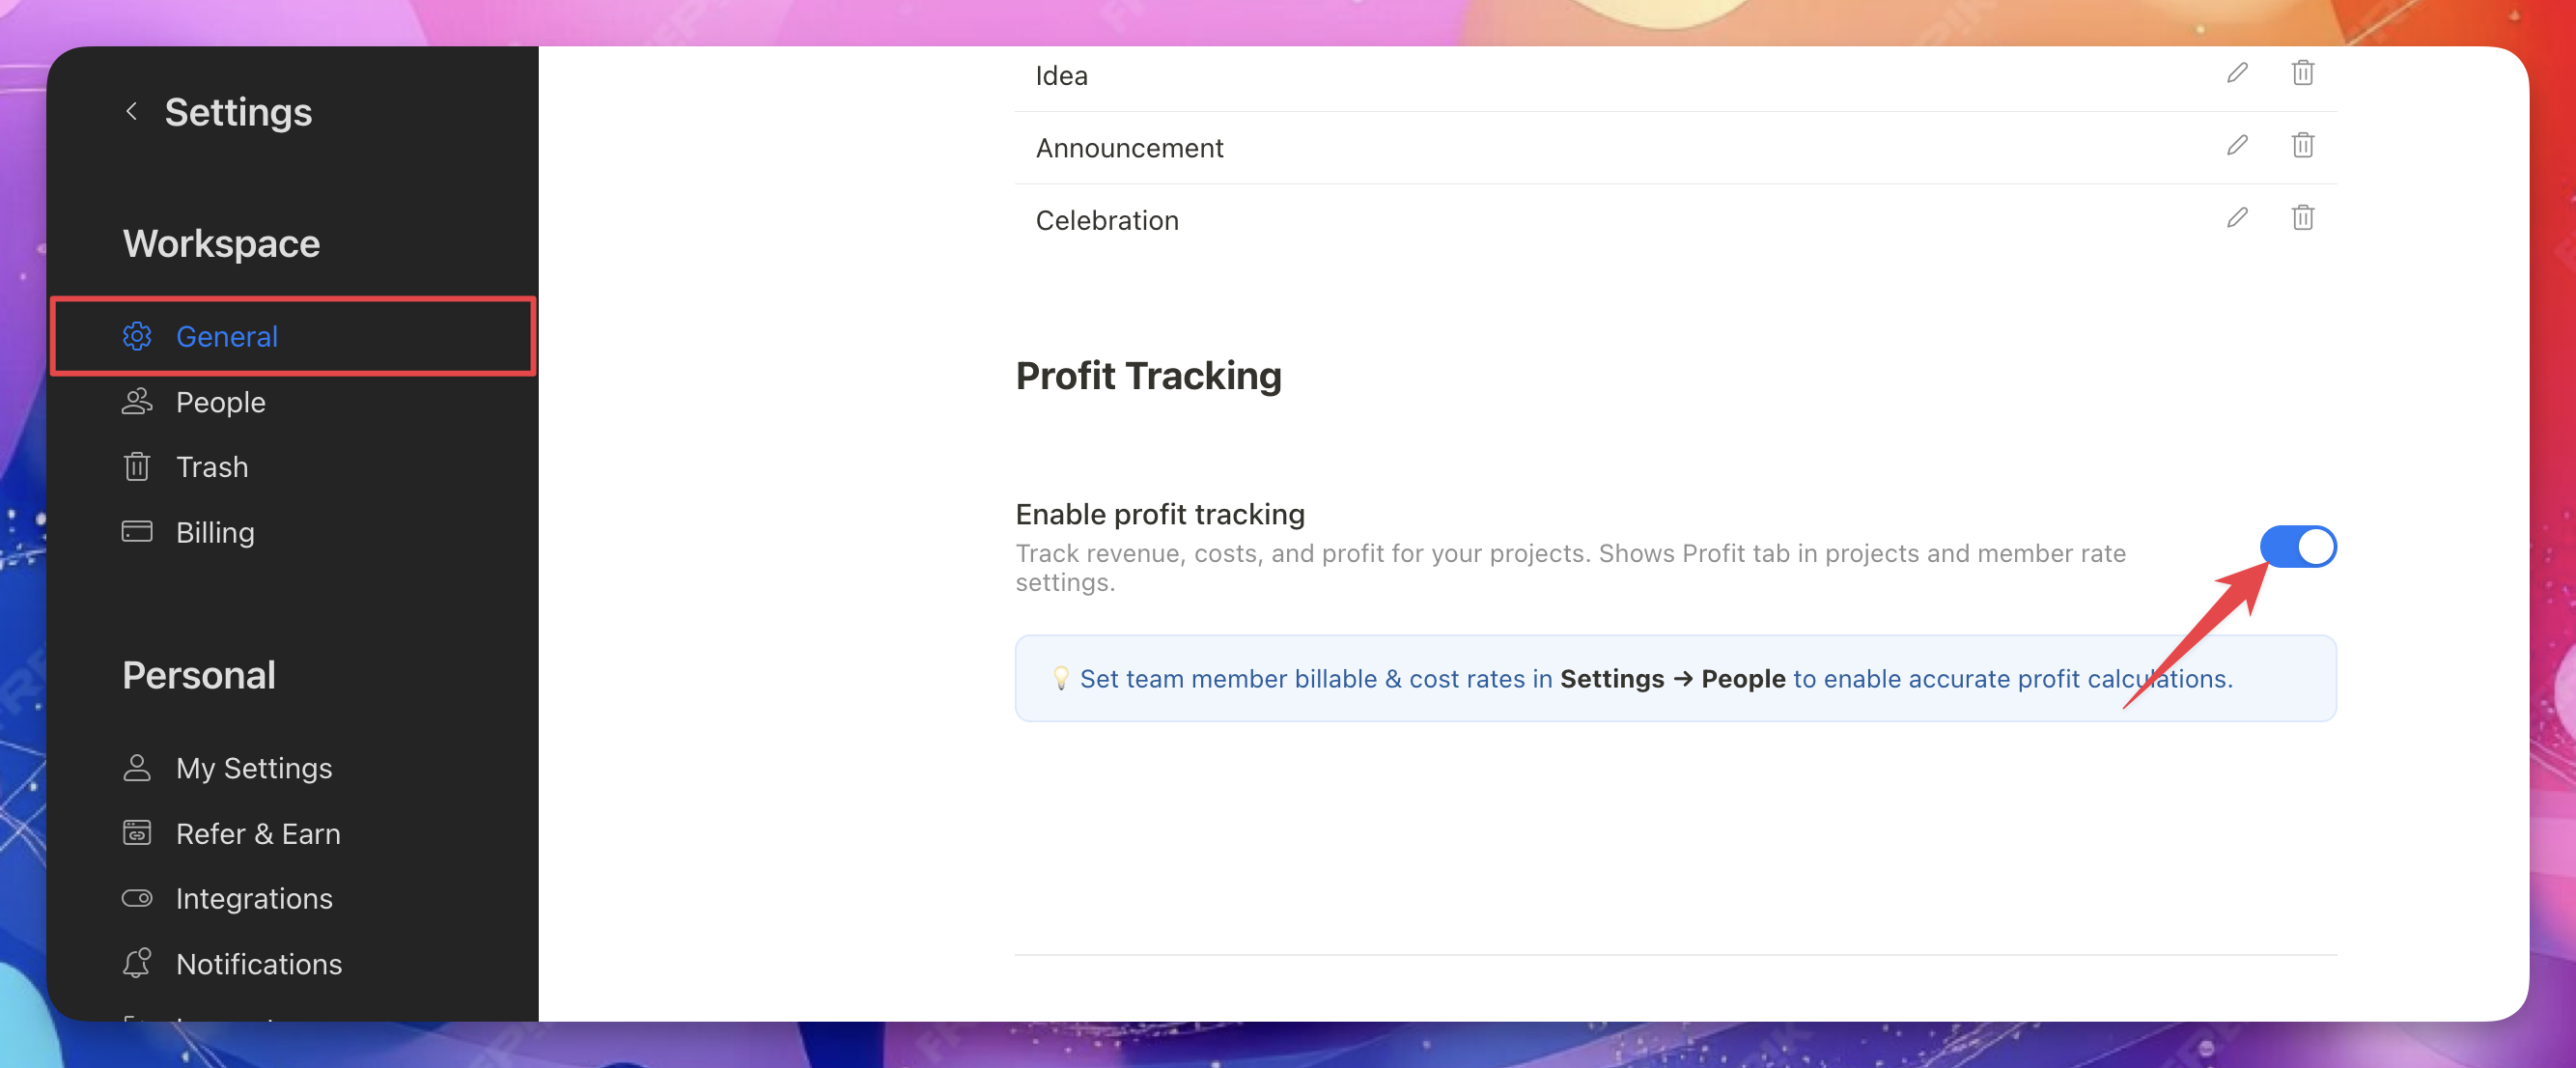
Don't need this?
You can turn off profit tracking two ways:
Hide for a specific project
Open the project's Customize panel → toggle off Profit.
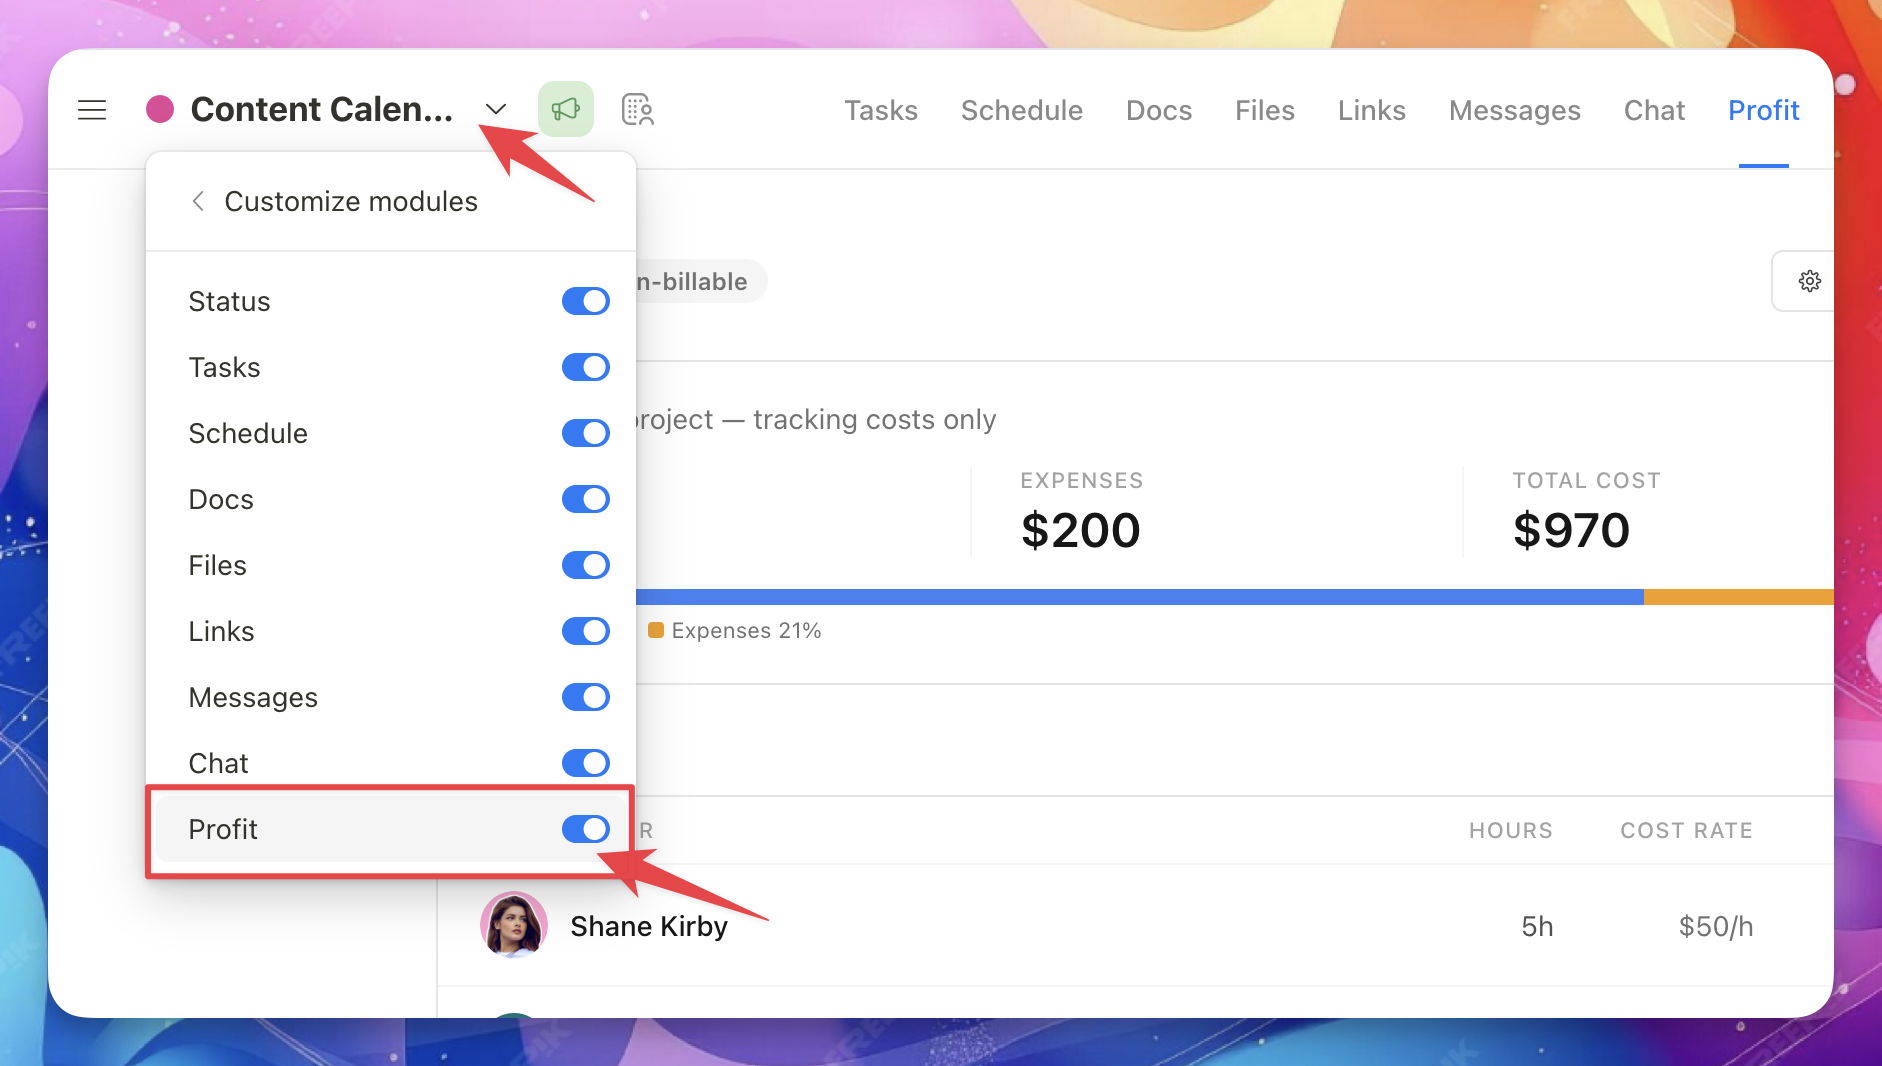
Turn off for all projects
Go to Settings - General → toggle off Enable Profit tracking.
FAQs
Who can see the Profit tab?
Only workspace owners and admins. Team members and guests cannot see financial data.
Do I need to set up rates before using Profit Tracking?
Yes. Without billable and cost rates, Upbase can't calculate revenue (for hourly projects) or labor costs. Time entries logged before rates are set will not appear in profit calculations, even after you configure the rates. Set rates in Settings → Members before your team starts logging time.
Can I have different billable rates per project?
Yes. In the Revenue section of an hourly project, click the rate next to a team member's name to set a project-specific override. Other projects continue using the workspace rate.
What happens when I change a rate?
The new rate applies to future time entries only. Past entries keep their original rate.
Can team members add expenses?
Expenses can only be added by workspace owners and admins, since the Profit tab is not visible to regular team members.
Does changing the workspace currency convert my amounts?
No. Changing currency only updates the display symbol. All numbers stay the same. Update your rates manually if you're switching to a different currency.
Can I change a retainer's billing cycle dates after logging time or expenses?
No. Once time or expenses have been logged against any billing period, the cycle dates are locked. This protects your financial history. If the client's terms change, create a new retainer project with the updated dates. Both projects will appear on the client-level profit rollup.
Can I export profit data?
Yes, you can export profit tracking data as a CSV file.